
内部HTTPSアプリケーションへのアクセスを、VPNから最新のゼロトラスト方式へ移行する
リモートワーカーがGKE(Google Kubernetes Engine)の内部アプリケーションにアクセスするために、いまだVPN接続を運用していませんか?もっとスマートな方法があります。本記事では、従来のVPNベースのアクセスを、GKE External Gatewayを活用したGoogle CloudのIdentity-Aware Proxy(IAP)に置き換える方法を解説します。この最新のアプローチは、運用負荷を軽減するだけでなく、IAMによる認証・認可によって、よりきめ細かなアクセス制御を実現します。
なぜ移行すべきか
従来のVPNベースの内部アプリケーションアクセスには、次のような課題があります。
- VPNトンネル管理に伴う高い運用負荷
- VPNインフラに必要な追加コスト
- 複雑なネットワークルーティング構成
- きめ細かなアクセス制御の難しさ
IAP対応のExternal Gatewayを導入すれば、次のメリットが得られます。
- 複数のアプリケーションを単一のHTTPSロードバランサー配下に集約
- 異なるGKEネームスペースをまたぐアクセスを効率的に管理
- Google Cloudの堅牢な認証システムを活用
- インフラのコストと複雑さを削減
GKE Ingress vs Gateway:IAP実装の比較
GKEでIAPを実装するには、主にGKE IngressとGKE Gatewayという2つのアプローチがあります。環境に最適な方式を選ぶうえで、両者の違いを理解しておくことが重要です。
GKE Ingressの制約
- ネームスペースの制約:GKE Ingressは、Ingressリソースがデプロイされたネームスペース内のServiceしか参照できません。
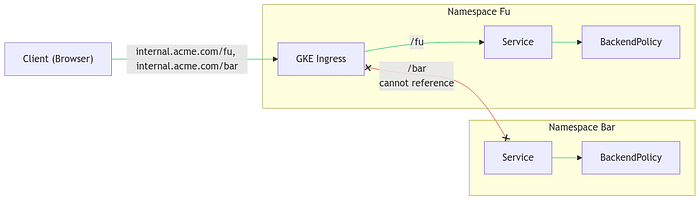
ネームスペースFuにあるGKE Ingressは、ネームスペースBarのServiceを参照できない
- ロードバランサーリソース:アプリケーションが複数のネームスペースにまたがる場合、ロードバランサーが複数必要になることがあります。
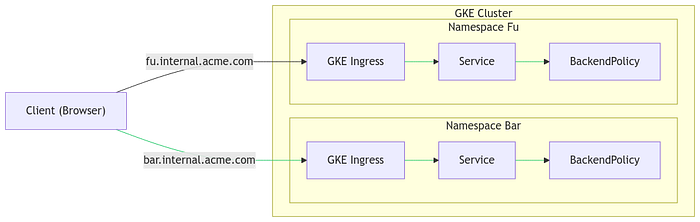
サービスが別々のネームスペースにある場合は、HTTPS LBを2つ用意する必要があり、さらにドメインベースのルーティングも組み合わせるため、構成が一段と複雑になる
Cloud bill shouldn't be a mystery
One platform for AI and Cloud optimization.
GKE Gatewayのメリット
- クロスネームスペース対応:単一のGatewayリソースから、別のネームスペースのServiceにもトラフィックをルーティング可能
- シンプルなアーキテクチャ:1つのロードバランサーで、ネームスペースを問わず複数のアプリケーションを処理可能
- 柔軟なルーティング:ネームスペースをまたぐ複雑なルーティングパターンも容易に実装可能
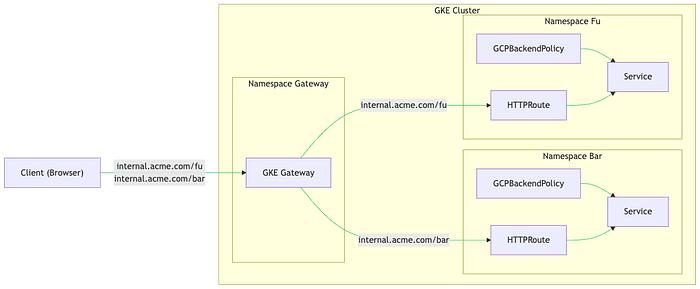
あるネームスペースに置いたGKE Gatewayから、単一のHTTPS LBを介して他のネームスペースのServiceへトラフィックを送信できる
実装ガイド
前提条件
- GKE Standard v1.24以上、またはGKE Autopilot v1.26以上
- VPCネイティブのクラスター構成
- HttpLoadBalancingアドオンが有効化されていること
ステップ1:GKEクラスターを作成する
gcloud container clusters create test-gateway \
 --region=us-central1 \
 --release-channel=regular \
 --enable-ip-alias \
 --num-nodes=1 \
 --addons HttpLoadBalancing \
 --gateway-api=standard

gcloud container clusters get-credentials test-gateway --region us-central1
ステップ2:SSL証明書を設定する
cat <<EOF | kubectl apply -f -
apiVersion: networking.gke.io/v1
kind: ManagedCertificate
metadata:
 name: gateway-nir-dns-tests-google-com
 namespace: default
spec:
 domains:
 - gateway.nir-dns-tests-google-com
EOF
ステップ3:外部IPを確保し、DNS Aレコードを向ける
ManagedCertificateをプロビジョニングするには、HTTPS LBを指すDNS Aレコードが必須であり、かつその証明書をHTTPS LBに紐付ける必要があります(証明書の紐付けは次のステップで行います)。
gcloud compute addresses create gateway --project=nir-playground --global
RESERVED_IP=$(gcloud compute addresses describe gateway --global | grep address: | awk '{print $2}')

gcloud dns --project=nir-playground record-sets create gateway.nir-dns-tests-google-com. \
  --zone="nir-dns-tests-google-com" --type="A" --ttl="60" --rrdatas=$RESERVED_IP
ステップ4:Gatewayリソースをデプロイする
ポイントとして、gatewayClassNameはグローバル外部HTTPS LBを指定しており、listeners配列ではあらゆるネームスペースからのHTTPRouteのアタッチを許可しています。また、addresses[0].typeをNamedAddressesに設定し、その値には静的IPを予約した際の名前(本例では「gateway」)を指定しています。
CERT_NAME=$(kubectl get managedcertificate gateway-nir-dns-tests-google-com -o=jsonpath="{.status.certificateName}")

cat <<EOF | kubectl apply -f -
kind: Gateway
apiVersion: gateway.networking.k8s.io/v1beta1
metadata:
 name: external-http
spec:
 gatewayClassName: gke-l7-global-external-managed
 listeners:
 - name: https
   protocol: HTTPS
   port: 443
   allowedRoutes:
     namespaces:
       from: All
   tls:
     mode: Terminate
     options:
       networking.gke.io/pre-shared-certs: $CERT_NAME
 addresses:
 - type: NamedAddress
   value: gateway
EOF

# Verify Gateway IP assignment
while true; do
 GATEWAY_IP=$(kubectl get gateway external-http -o=jsonpath="{.status.addresses[0].value}")
 if [ "$GATEWAY_IP" != "" ]; then
   break
 fi
 sleep 3
done
ステップ5:ManagedCertificateのステータスを確認する
# Verify certificate status
while true; do
 STATUS=$(kubectl get managedcertificate gateway-nir-dns-tests-google-com -o=jsonpath="{.status.certificateStatus}")
 if [ "$STATUS" = "Active" ]; then
   break
 fi
 echo "Certificate is in $STATUS status, will check again if it became active in 3 seconds"
 sleep 3
done
ステップ6:サンプルアプリケーションをデプロイする
kubectl create namespace first-namespace
kubectl create namespace second-namespace

# Deploy App A in first-namespace
cat <<EOF | kubectl apply -n first-namespace -f -
apiVersion: apps/v1
kind: Deployment
metadata:
 name: app-a
spec:
 replicas: 2
 selector:
   matchLabels:
     app: app-a
 template:
   metadata:
     labels:
       app: app-a
   spec:
     containers:
     - name: app-a
       image: hashicorp/http-echo
       args: ["-text=Hello from App A"]
       ports:
       - containerPort: 5678
EOF

# Create Service for App A
cat <<EOF | kubectl apply -n first-namespace -f -
apiVersion: v1
kind: Service
metadata:
 name: service-a
spec:
 selector:
   app: app-a
 ports:
 - protocol: TCP
   port: 80
   targetPort: 5678
EOF

# Deploy App B in second-namespace
cat <<EOF | kubectl apply -n second-namespace -f -
apiVersion: apps/v1
kind: Deployment
metadata:
 name: app-b
spec:
 replicas: 2
 selector:
   matchLabels:
     app: app-b
 template:
   metadata:
     labels:
       app: app-b
   spec:
     containers:
     - name: app-b
       image: hashicorp/http-echo
       args: ["-text=Hello from App B"]
       ports:
       - containerPort: 5678
EOF

# Create Service for App B
cat <<EOF | kubectl apply -n second-namespace -f -
apiVersion: v1
kind: Service
metadata:
 name: service-b
spec:
 selector:
   app: app-b
 ports:
 - protocol: TCP
   port: 80
   targetPort: 5678
EOF
ステップ7:IAPを有効化し、IAP認証情報用のk8s Secretを作成する
echo -n CLIENT_SECRET_REDACTED > iap-secret.txt
kubectl create secret generic iap --from-file=key=iap-secret.txt
ステップ8:IAPを適用するGCPBackendPolicyを作成する
# Enable IAP for App A
cat <<EOF | kubectl apply -n first-namespace -f -
apiVersion: networking.gke.io/v1
kind: GCPBackendPolicy
metadata:
 name: backend-policy
spec:
 default:
   iap:
     enabled: true
     oauth2ClientSecret:
       name: iap
     clientID: REPLACE_WITH_YOUR_IAP_OAUTH_CLIENT_ID
 targetRef:
   group: ""
   kind: Service
   name: service-a
EOF

# Enable IAP for App B
cat <<EOF | kubectl apply -n second-namespace -f -
apiVersion: networking.gke.io/v1
kind: GCPBackendPolicy
metadata:
 name: backend-policy
spec:
 default:
   iap:
     enabled: true
     oauth2ClientSecret:
       name: iap
     clientID: REPLACE_WITH_YOUR_IAP_OAUTH_CLIENT_ID
 targetRef:
   group: ""
   kind: Service
   name: service-b
EOF
ステップ9:HTTPRouteを作成する
# Create route for App A
cat <<EOF | kubectl apply -f -
apiVersion: gateway.networking.k8s.io/v1beta1
kind: HTTPRoute
metadata:
 name: route-a
 namespace: first-namespace
spec:
 parentRefs:
 - name: external-http
   kind: Gateway
   namespace: default
 rules:
 - matches:
   - path:
       value: /first
   backendRefs:
   - name: service-a
     port: 80
EOF

# Create route for App B
cat <<EOF | kubectl apply -f -
apiVersion: gateway.networking.k8s.io/v1beta1
kind: HTTPRoute
metadata:
 name: route-b
 namespace: second-namespace
spec:
 parentRefs:
 - name: external-http
   kind: Gateway
   namespace: default
 rules:
 - matches:
   - path:
       value: /second
   backendRefs:
   - name: service-b
     port: 80
EOF
ステップ10:IAPで保護されたアプリにアクセスする
IAPで保護されたURLにアクセスすると、Googleのサインイン画面が表示されます。アプリケーションがデプロイされているGoogle Cloud組織に所属し、かつIAP-Secured Web App UserのIAM権限を付与されたユーザーだけが、アプリケーションにアクセスできます。
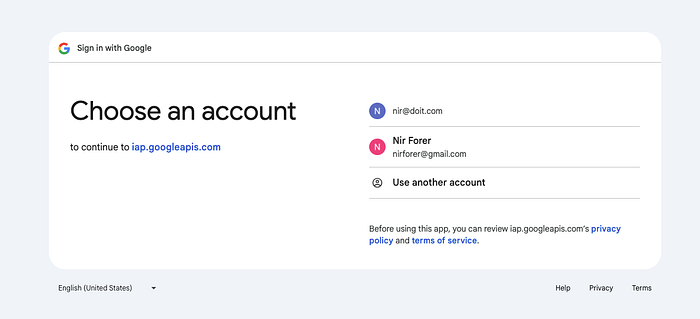
[email protected]はdoit.comのGCP組織に所属し、必要なIAM権限が付与されているためアプリケーションにアクセスできます。一方、[email protected]は当該組織に所属していないため、アクセスできません。
組織外のユーザーや権限を付与されていないユーザーがサインインしてアクセスを試みると、権限拒否ページが表示されます。
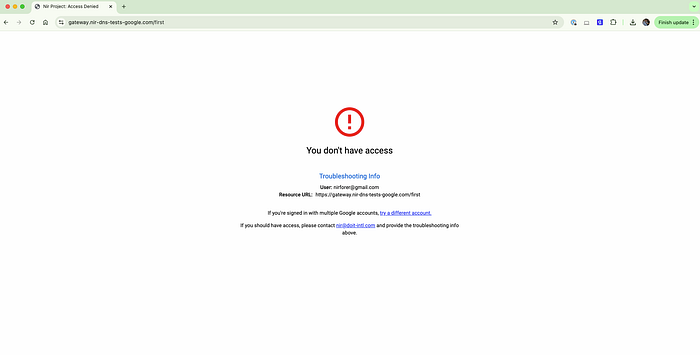
権限のないプリンシパルに表示される権限拒否ページ
GKEのアクセス方式をVPNからIAP対応External Gatewayへと刷新することは、Google Cloudインフラのセキュリティと運用効率を高めるための一つの手段にすぎません。このアプローチは、セキュリティを強化すると同時に、運用負荷とコストの削減にもつながります。
本ガイドではGKEアクセスの刷新に焦点を当てましたが、同じような変革のチャンスはクラウドインフラ全体に広がっています。コスト最適化、インフラ自動化、セキュリティ強化、クラウドアーキテクチャ設計まで、DoiT Internationalは複数のクラウド領域で豊富な専門知識を提供します。クラウドインフラの他の領域の刷新支援や、その他のクラウドエンジニアリングソリューションについては、doit.com/expertise/をご覧ください。


