In my [previous post](https://www.doit.com/blog/instant-on-scaling-eliminating-node-provisioning-delays-in-gke-with-active-buffer), I covered how GKE's [Active Buffer](https://docs.cloud.google.com/kubernetes-engine/docs/concepts/capacity-buffer) solved one of the most painful problems in Kubernetes operations: node provisioning latency. By letting you declare a [`CapacityBuffer`](https://docs.cloud.google.com/kubernetes-engine/docs/reference/crds/capacitybuffer) resource, Active Buffer keeps pre-warmed nodes ready to absorb traffic spikes instantly — no more multi-minute cold starts, no more balloon pods, no more hand-rolled `PriorityClass` gymnastics.
But as with any architectural pattern that keeps raw on-demand nodes running idle, active buffers come at a cost. While it is cheaper than blindly over-provisioning an entire cluster, you still need to pay a premium to have full virtual machines standing 24/7. If you need a large safety net — say, 50 CPUs and 50 GiB of RAM held in reserve — you're paying full compute rates for nodes that sit idle.
Google shipped the answer to that problem in June 2026: **[Standby Buffers](https://docs.cloud.google.com/kubernetes-engine/docs/concepts/capacity-buffer#standby_buffer)**, a new `provisioningStrategy` for the `CapacityBuffer` API that lets GKE pre-provision and fully initialize nodes in a suspended state. Available from GKE version `1.36.0-gke.2253000` onwards, standby buffers let you achieve sub-second scheduling for unpredictable workloads while slashing idle infrastructure costs by up to 90% compared to full over-provisioning.
> **Note:** Standby buffers are currently in **Preview** and subject to the "Pre-GA Offerings Terms". Review the [requirements and limitations](https://docs.cloud.google.com/kubernetes-engine/docs/concepts/capacity-buffer#requirements_and_limitations) before using in production.
## The Evolution: Active vs. Standby Buffers
To understand the value of standby buffers, it helps to contrast how each strategy treats compute infrastructure:
**Active Buffers (`buffer.x-k8s.io/active-capacity`):** GKE creates lightweight placeholder pods to represent pending demand. The Cluster Autoscaler intercepts this and provisions real, fully running VMs. Nodes are up, DaemonSets are loaded, and instances run at full billing rates. When actual workload pods scale up, they instantly take over this warm capacity.
**Standby Buffers (`buffer.gke.io/standby-capacity`):** GKE provisions and fully initializes the nodes — spinning up DaemonSets and allowing time to preload container images — and then **suspends the underlying compute instances**. The OS state is preserved on disk, compute and memory billing stops, and you pay only for the persistent disk and IP address. When demand spikes, these suspended nodes resume **2–3x faster** than provisioning a fresh VM from scratch because the OS and Kubernetes bootstrap steps are already done.
**The Benchmarks:** In [early benchmarks](https://cloud.google.com/blog/products/containers-kubernetes/gke-standby-buffers-speed-up-autoscaling-for-less-spend) released by Google shows, a cluster utilizing standby buffers delivered sub-second scheduling latency for dynamic workloads (like AI Agent Sandboxes) at up to a 90% lower cost compared to classic over-provisioning.

gke-cluster-3-nap-n4-highcpu-4-1b5c18-fb0115cd-mrfm True
```
The three possible states are:
- `` — node is active and was never suspended (e.g. a regular cluster node or active buffer node)
- `False` — node was previously suspended but has been resumed to serve workloads
- `True` — node is currently suspended (standby buffer, paying only for disk and IP)
## Image Preloading: Don't Skip It
A suspended node resumes faster than a cold start, but your workload images still need to be present on the node when a real pod lands. The `standby-capacity-init-time` annotation gives the node a startup window before suspension, but images won't be pulled automatically unless something explicitly requests them during that window.
GKE's supported approach is to deploy an image-preloading [DaemonSet](https://docs.cloud.google.com/kubernetes-engine/docs/how-to/configure-capacity-buffer#preload-images) that runs during the init window. The key detail is the toleration for the `buffer.gke.io/standby-node-suspended` taint — this ensures the DaemonSet is scheduled on standby buffer nodes, which would otherwise be skipped. An init container then pulls your target image, forcing containerd to cache the image layers to local disk before the node suspends.
When a scaling event occurs, the node wakes from standby with the image already in local storage — the pod starts immediately rather than waiting on a registry pull.
## Summary
Standby buffer completes the GKE capacity buffer story. Active buffer solves node provisioning latency by keeping warm, running capacity ready. Standby buffer solves the cost of maintaining that safety net at scale.
By adopting a declarative, two-tier active and standby capacity buffer strategy, you can build a self-healing infrastructure that responds to user demand in milliseconds while keeping your FinOps team incredibly happy.
Start with a small standby buffer alongside an active buffer, observe how your traffic patterns interact with the resume window, and grow from there. Google also created a [buffer sizing simulator](https://github.com/gke-labs/buffers-simulator) which is genuinely useful for sizing the buffers to achieve your performance targets. Full configuration reference is in the [GKE capacity buffer docs](https://docs.cloud.google.com/kubernetes-engine/docs/concepts/capacity-buffer).
Source: Google Cloud Blog
In latency tests under identical traffic loads, a cluster without buffers saw P95 and P99 scheduling latencies stuck between 4 and 6 minutes. The cluster with standby buffers maintained a P50 of single-digit seconds, with P95/P99 briefly peaking at one minute before completely normalizing. 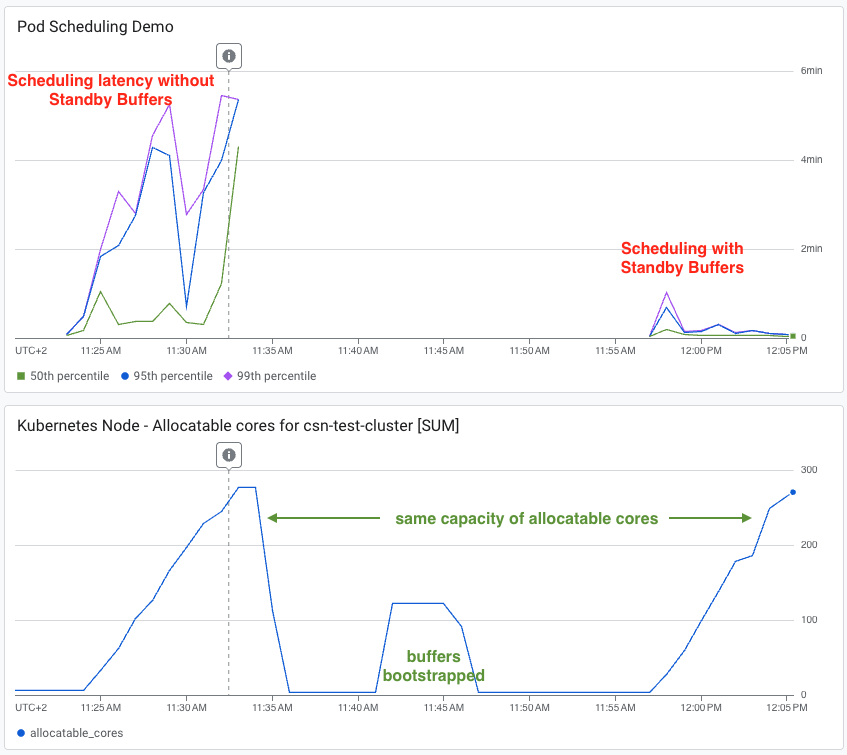Source: Google Cloud Blog
## Choosing the Right Buffer Strategy If your application requires the absolute lowest possible pod scheduling latency, you shouldn't rely solely on standby buffers. While resuming a suspended node is fast (roughly 30 seconds compared to several minutes for a cold start), it still introduces a brief window of latency for immediate, unpredictable spikes. The ultimate architectural pattern is a hybrid, two-tier buffer system: 1. **Active Buffer (The Shock Absorber):** A small pool of fully running, capacity-reserved nodes absorbs the immediate, unpredictable spike with sub-second scheduling latency. 2. **Standby Buffer (The Deep Reservoir):** A larger pool of suspended nodes resumes in roughly 30 seconds to cover extended traffic surges. As the active buffer units get consumed, waking standby nodes refill the active tier. ```text [ Incoming Traffic Spike ] │ ▼ ┌──────────────────────────────────────┐ │ Tier 1: Active Buffer (Instant) │ ──► Absorbs immediate surge └──────────────────────────────────────┘ │ (As Tier 1 depletes...) ▼ ┌──────────────────────────────────────┐ │ Tier 2: Standby Buffer (~30s Wake) │ ──► Wakes up to cover extended traffic surge └──────────────────────────────────────┘ ``` **Sizing Philosophy:** Keep your active buffer lean and cheap—just large enough to bridge the 30-second gap it takes for standby nodes to wake up. Keep your standby buffer large enough to cover the full, extended volume of a sustained traffic peak. ## Declarative Configuration: How to Implement Standby Buffers The configuration change from an active buffer is minimal. You simply add the `provisioningStrategy` field to your CapacityBuffer spec, set it to `buffer.gke.io/standby-capacity`, and optionally tune two new annotations that control suspension timing and refresh frequency. ### Prerequisites To take advantage of standby buffers, ensure your GKE Standard cluster is running version `1.36.0-gke.2253000` or later. Node auto-provisioning is **required** for standby buffers. Refer to the [official documentation](https://docs.cloud.google.com/kubernetes-engine/docs/concepts/capacity-buffer#requirements_and_limitations) for full requirements and limitations. ### Step 1: Create a Namespace and ComputeClass If you want to configure fallback compute priorities, then define a [`ComputeClass`](https://docs.cloud.google.com/kubernetes-engine/docs/concepts/about-custom-compute-classes): ```YAML apiVersion: v1 kind: Namespace metadata: name: platform-scaling --- apiVersion: cloud.google.com/v1 kind: ComputeClass metadata: name: high-perf-compute namespace: platform-scaling spec: priorities: - machineFamily: n4 - machineFamily: n4d - machineFamily: c4 - machineFamily: c4d nodePoolAutoCreation: enabled: true ``` ### Step 2: Define the buffer unit Create a `PodTemplate` that mirrors the resource profile of the workloads you intend to scale. GKE uses this to determine how much compute capacity each buffer unit requires. ```YAML apiVersion: v1 kind: PodTemplate metadata: name: app-buffer-template namespace: platform-scaling template: spec: terminationGracePeriodSeconds: 0 containers: - name: buffer-container image: registry.k8s.io/pause:3.9 resources: requests: cpu: "1" memory: "1Gi" limits: cpu: "1" memory: "1Gi" nodeSelector: cloud.google.com/compute-class: high-perf-compute ``` ### Step 3: Create the Standby Buffer The `provisioningStrategy` field is the only meaningful addition over an active buffer. The two [annotations](https://docs.cloud.google.com/kubernetes-engine/docs/how-to/configure-capacity-buffer#customize-standby-behavior) control how long a node stays active before suspension and how often suspended nodes are refreshed to stay current with DaemonSet versions and image layers. ```yaml apiVersion: autoscaling.x-k8s.io/v1beta1 kind: CapacityBuffer metadata: name: my-standby-buffer namespace: platform-scaling annotations: # How long a node stays active after init before being suspended (default: 5m) # Increase if your workload needs time to preload heavy images or ML models buffer.gke.io/standby-capacity-init-time: "5m" # How often suspended nodes are recreated to stay fresh (default: 1d) buffer.gke.io/standby-capacity-refresh-frequency: "1d" spec: podTemplateRef: name: app-buffer-template limits: cpu: "50" memory: "50Gi" provisioningStrategy: "buffer.gke.io/standby-capacity" ``` ### Step 4: Pair with a small active buffer (recommended) An active buffer of seven 5 CPUs and 5 GB of RAM ```yaml apiVersion: autoscaling.x-k8s.io/v1beta1 kind: CapacityBuffer metadata: name: my-active-buffer namespace: platform-scaling spec: podTemplateRef: name: app-buffer-template limits: cpu: "5" memory: "5Gi" provisioningStrategy: "buffer.x-k8s.io/active-capacity" ``` ### Step 5: Verify suspended nodes You can verify that your capacity buffer is managing suspended nodes natively through `kubectl`. The suspended nodes can be identified by condition Suspended. ```bash kubectl get nodes -o custom-columns=\ 'NAME:.metadata.name,SUSPENDED:.status.conditions[?(@.type=="Suspended")].status' ``` Sample output: ```yaml NAME SUSPENDED gke-cluster-3-nap-n4-highcpu-2-nm9ieq-586f2c73-4v2z False gke-cluster-3-nap-n4-highcpu-2-nm9ieq-586f2c73-pdbs