
Cloud Intelligence™
Stop Wrestling with Complex Permissions: A Breath of Fresh Air for Your Code
This page is also available in Deutsch, Español, Français, Italiano, 日本語, and Português.


About Dima Kramskoy
Solutions architect who takes ideas from zero to proven. With over 20 years of software engineering, I build PoCs and MVPs on AWS that prove the path before you commit — spanning GenAI, DevOps, and FinOps. Off the clock: live-fire cooking, fishing, the outdoors, and applying Extreme Ownership to everything.
My personal pageOverview
This post walks through Amazon Verified Permissions (AVP) as a practical solution for managing complex application authorization, with a real-world walkthrough using the AWS PetStore example.
The Problem
Ever faced significant complexity while trying to manage all possible authorization roles, users, actors of your own SaaS product? Familiar with the pain of business requirements changes, targeting the best security principals while jingling code reviews, a/b tests related to the changes you're trying to implement? And yeah, you are running your SaaS on AWS cloud.
Guess it is time to take a deep breath and zoom out!! Think of your solution, and rethink it again, cuz I might be able to show you a relatively simple one! One that can help you with managing complexity, delegate your resources and efforts into something really matters - your business and your business needs!!
This solution is Amazon Verified Permissions.
How You Usually Handle Authorization in Your Web Application
Let's break down the web application authorization system. The need for such a system comes with application evolution. You can plan it ahead of time (which is better as part of your system design), but you will still face changes based on evolving business requirements. You will need to change different parts of your system after it has been deployed to production.
Why do we need such a system in place? For many reasons:
- You want to allow certain roles to see certain parts of your application
- You need to limit certain actions from specific roles/users of your application
- You need to enhance security controls and prevent unauthorized access
- Your permission logic ends up scattered across your codebase, making maintenance a nightmare
Your Average Permissions System: A Tangled Mess
Most authorization systems today look something like this — scattered if/else blocks throughout your code:
// The typical nightmare in your Lambda or Node.js service:boolean userAuthorizedForOrder(Order order, User user) { if (user.storeId == order.storeId) { if (user.roles.contains("store-owner")) { return true; // store owners can access their own store's orders } else if (user.roles.contains("customer")) { if (user.id == order.customerId) { return true; // customers can only see their own orders } } } return false;}And then? You add another role. Then another. Then a special case for regional managers. Then a rule about who can cancel orders after 24 hours. Then a new business requirement about weekend access. Suddenly you're drowning in nested conditions, your code reviews are brutal, every business requirement change becomes a deployment, and half your team is arguing about edge cases instead of building features.
The Real Pain Points
Role Explosion: Your 2 roles become 5, then 10, then you have manager-regional-with-store-employee-permissions-but-only-on-weekends, and nobody can keep track of who should have what.
Code Review Nightmare: Every permission change requires code changes. Devs are spending hours debating policy logic in PRs instead of shipping features.
Testing Authorization: How do you even test all the combinations? Matrix of users × roles × resources × actions = chaos. You miss edge cases, things break in production.
Audit Trail: Good luck explaining to compliance why that one user could access that order. It's buried in git history across 5 different files.
Zero Flexibility: Want to change permissions on a Friday? Too bad — that's a deployment. Want to roll back a policy quickly? Deploy again.
How You Can Manage It with Amazon Verified Permissions
So what if you have an opportunity to simplify that burden? What if I told you that you now have a service that can do the majority of work for web application permissions for you?
Instead of baking authorization into your code, what if you separated it completely? What if permissions were declarative, versioned, centralized, and you could change them without redeploying your application?
That's the promise of Amazon Verified Permissions (AVP).
The Architecture
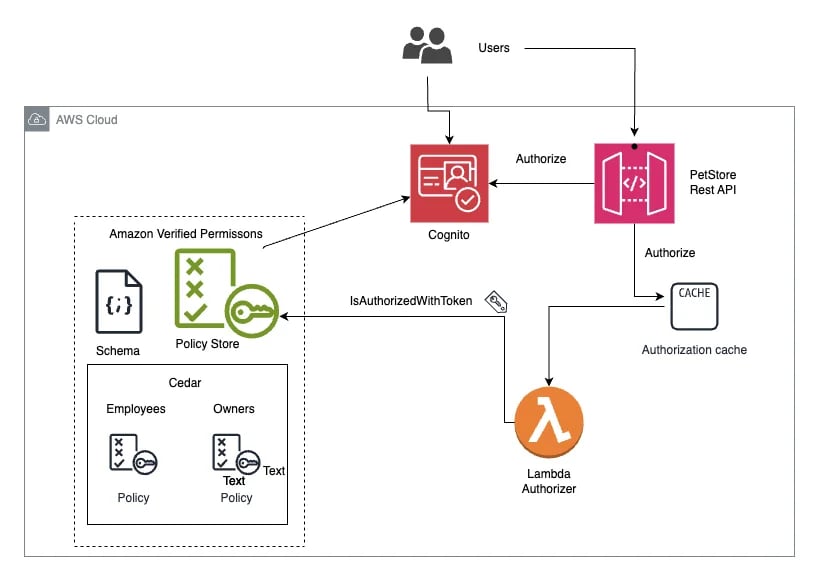
Here's how it works (at a high level):
- User authenticates via AWS Cognito (or any IdP)
- Your API receives the request with a JWT token
- Lambda Authorizer intercepts the request
- Lambda builds an authorization query with: principal (who), action (what they're doing), resource (what they're doing it to), context (additional attributes)
- Lambda calls AVP with that query
- AVP evaluates Cedar policies (a policy language designed for authorization)
- AVP returns ALLOW or DENY
- API Gateway enforces the decision - request proceeds or gets 403
The key insight: All permission logic lives in Cedar policies in AVP. Your code just says "is this authorized?" and trusts the answer.
The Real-World Example: PetStore
I've used the PetStore repository from AWS as an example application, including most of the features described, but with some slight changes as the provided schema didn't work — probably because of updates to the service made by AWS. Remember it is a relatively new service and I would assume it is in many areas still work in progress.
You simply use the steps provided and start from deploying the Amplify application. It might ask you to identify using your GitHub account in order to pull the repo and deploy into your AWS ecosystem. Once deployed, looking at the architecture diagram above, we can identify the components and how they communicate with each other.
Setting It Up - The Walkthrough
Step 1: Cognito Users and Groups
For the identity provider, we use AWS Cognito. After the deployment you can navigate to your Amazon Cognito dashboard and you should be able to find the User pool that starts with "petstoresample", this is your pool and this is where you should create the users and groups for this application.
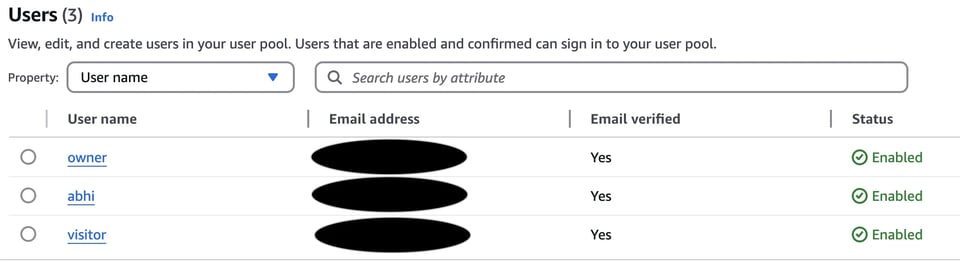
Create three users:
We need to create three users for this PoC. One has to be explicitly named "abhi" as this is hardcoded inside the Lambda function. The other two are more flexible — I called them "owner" and "visitor". When you create them:
- Don't send email verifications
- Mark them as "email address verified"
- Use something simple for passwords (you don't want to reset them after setup)
You should have something like this after all is done:
Add custom attributes to the owner user:
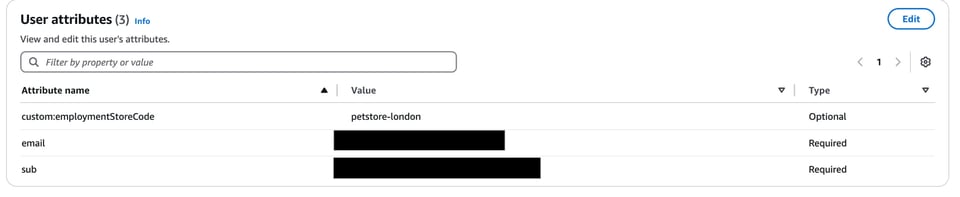
Don't forget to make updates to the "owner" user with custom attribute employmentStoreCode. This will be used as part of the policies later in Amazon Verified Permissions. Simply click "Edit" and update so your user's attributes will look like this:
Create groups and assign users:
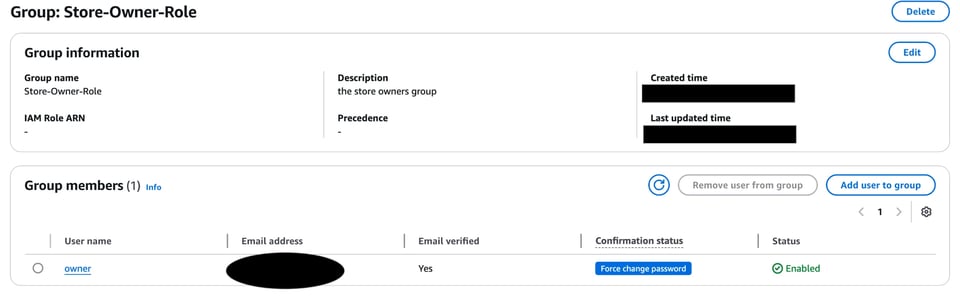
You need to create 2 groups and add users to those groups. These group names ("Store-Owner-Role" and "Customer") are part of the tokens issued by Cognito and will be used for Role-based access control (RBAC).
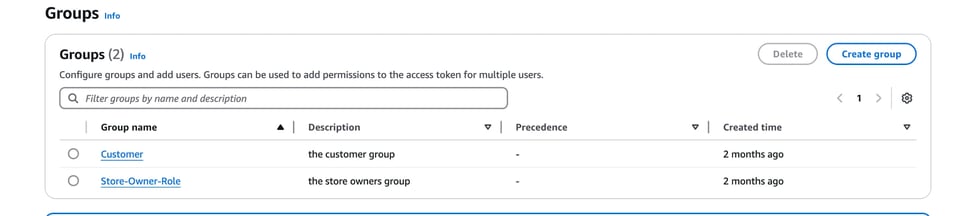
User "abhi" has to be added to the "Customer" group together with the other "visitor" user:
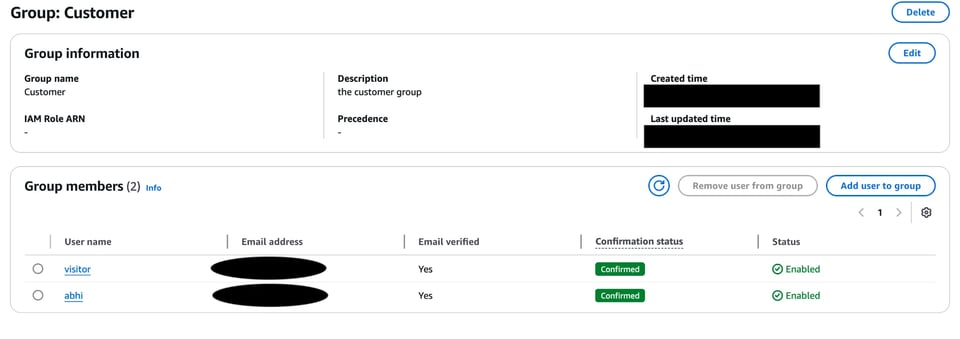
And obviously the "owner" with the additional tag we have added will go into the "Store-Owner-Role" group:
Step 2: Amazon Verified Permissions Setup
This part is completed, next is to review and configure the Amazon Verified Permissions. In this part we are going to review the Lambda Authorizer and the API Gateway as well — they were deployed using the same Amplify deployment, as part of the application.
Simply navigate to Amazon Verified Permissions by typing in the search input, and let's create a new Policy store first. In the repository they recommend starting from the schema but the UI has changed — you have to create the Policy store first. You can make up things if you'd like as eventually we will use the schema I'm providing. So you can simply specify an Empty Policy Store to make things easier, just give it a name "PetStore".
Step 3: Define Your Schema
This is crucial. The schema tells AVP what principals, resources, actions, and relationships exist in your application. Use this schema:
{ "MyApplication": { "actions": { "GetOrder": { "appliesTo": { "principalTypes": ["User"], "resourceTypes": ["Order"] } }, "GetStoreInventory": { "appliesTo": { "principalTypes": ["User"], "resourceTypes": ["Application"] } }, "ListOrders": { "appliesTo": { "principalTypes": ["User"], "resourceTypes": ["Application"] } }, "PlaceOrder": { "appliesTo": { "principalTypes": ["User"], "resourceTypes": ["Application"] } }, "SearchPets": { "appliesTo": { "principalTypes": ["User"], "resourceTypes": ["Application"] } } }, "entityTypes": { "Application": { "memberOfTypes": [], "shape": { "attributes": { "storeId": {"type": "String"} }, "type": "Record" } }, "Order": { "memberOfTypes": [], "shape": { "attributes": { "owner": { "name": "User", "type": "Entity" }, "storeId": { "type": "String" } }, "type": "Record" } }, "Pet": { "memberOfTypes": [], "shape": { "attributes": { "owner": { "name": "User", "type": "Entity" }, "storeId": { "type": "String" } }, "type": "Record" } }, "Group": { "memberOfTypes": [], "shape": { "attributes": {}, "type": "Record" } }, "User": { "memberOfTypes": ["Group"], "shape": { "attributes": { "employmentStoreCode": {"type": "String"} }, "type": "Record" } } } }}The schema in the original project has a small issue, so instead, copy this into your Policy Store schema.
Step 4: Create Cedar Policies
Click on the Policy Store and on the left panel you will see the "Policies" link. Click on it and then click on "Create Policy > Create static policy". The wizard of policy creation is using the schema we have added. We are using permissive policies — the scope should be defined to the group of participants, the resource scope has to be the specific resource where you choose what you need and the action type has to be selected as specific set of actions.
There is one trick you can use to run the fully permissive policy by selecting "All principals", "All resources" and "All actions", save the policy, then edit it and simply paste the policy using Cedar language. It is the workaround but you need to know your policy declaration.
Here are the policies you would need for this PoC:
RBAC Example — Customers can search pets and place orders:
permit( principal in MyApplication::Group::"Customer", action in [MyApplication::Action::"SearchPets", MyApplication::Action::"PlaceOrder"], resource == MyApplication::Application::"main");ABAC Example — Store owners can only access their own store's inventory:
permit( principal in MyApplication::Group::"Store-Owner-Role", action == MyApplication::Action::"GetStoreInventory", resource == MyApplication::Application::"main")when { principal.employmentStoreCode == resource.storeId};ABAC Example — Users can only view their own orders:
permit( principal in MyApplication::Group::"Customer", action == MyApplication::Action::"GetOrder", resource is MyApplication::Order)when { principal == resource.owner};Cloud bill shouldn't be a mystery
One platform for AI and Cloud optimization.
The Lambda Authorizer Integration
Your Lambda function receives the API request and needs to:
- Verify the JWT token (extract user info)
- Build an authorization query for AVP
- Call AVP's
isAuthorizedAPI - Return ALLOW/DENY
Here's what that looks like (from the actual PetStore repo):
const AWS = require('aws-sdk');const avp = new AWS.Service({  apiConfig: require('./verifiedpermissions.json')});
const { CognitoJwtVerifier } = require("aws-jwt-verify");const jwtVerifier = CognitoJwtVerifier.create({  userPoolId: process.env.USERPOOLID,  tokenUse: "id",  clientId: process.env.APPCLIENTID});
const policyStoreId = process.env.POLICYSTOREID;
exports.handler = async (event) => {  // Extract and verify the JWT token  const token = event.headers["Authorization"];  let payload;
  try {    payload = await jwtVerifier.verify(token);    var groups = payload["cognito:groups"] || [];
    // Build the principal entity (the user)    var userEntity = {      "identifier": {        "entityType": "MyApplication::User",        "entityId": payload["cognito:username"]      },      "attributes": {        "employmentStoreCode": {          "string": payload["custom:employmentStoreCode"] == null ? "" : payload["custom:employmentStoreCode"]        }      },      "parents": []    };
    // Add groups as parent entities (for group membership)    groups.forEach((group) => {      userEntity.parents.push({        "entityType": "MyApplication::Group",        "entityId": group      });    });
    // Build the authorization query    let entities = {      entityList: [userEntity]    };
    // Add resource entities based on the action    addResourceEntities(entities, actionMap[event.httpMethod + event.resource], event.pathParameters);
    // Call AVP    let authQuery = {      policyStoreId,      principal: { "entityType": "MyApplication::User", "entityId": payload["cognito:username"] },      action: { "actionType": "MyApplication::Action", "actionId": actionMap[event.httpMethod + event.resource] },      resource: buildResource(actionMap[event.httpMethod + event.resource], event.pathParameters),      entities    };
    const authResult = await avp.isAuthorized(authQuery).promise();
    if (authResult.decision == 'ALLOW') {      return buildResponse(200, 'Authorized', authResult);    } else {      return buildResponse(403, "You are not authorized to perform this action.", authResult);    }  } catch(err) {    console.log(err);    return buildResponse(403, "Error: " + err);  }};
Key takeaway: Your code doesn't contain any permission logic. It just passes context to AVP and trusts the answer. That's the whole point.
The Real Benefit — Change Without Redeployment
Here's where the magic happens.
Scenario: Your business says "Starting next month, Store-Owner-Role users can also cancel orders, but only orders placed more than 24 hours ago."
With traditional hardcoded permissions:
- You modify the Lambda code
- You add a
getOrderAge()function - You write tests for the new logic
- You commit, create PR, wait for code review
- Someone questions your logic, you iterate
- You merge, deploy to staging, test
- You deploy to production
- If there's a bug, you deploy again while the business is losing money
With Amazon Verified Permissions:
- You log into the AVP console
- You add a new Cedar policy (takes 2 minutes):
permit( principal in MyApplication::Group::"Store-Owner-Role", action == MyApplication::Action::"CancelOrder", resource is MyApplication::Order)when { principal.employmentStoreCode == resource.storeId && resource.age > 1440 // minutes};- Hit save
- It's live. Immediately. No deployment. No code change. No Lambda redeploy.
That's it. Your code didn't change. Your Lambda didn't redeploy. The authorization rule updated in real-time.
RBAC + ABAC: Best of Both Worlds
Cedar lets you combine both approaches:
RBAC alone: "Is the user in the Admin group?" (binary, doesn't consider resource attributes)
ABAC alone: "Does the user's department attribute match the resource's department attribute?" (fine-grained, but requires lots of attributes)
RBAC + ABAC (Cedar's strength): "Is the user in the Store-Owner-Role group AND does their employmentStoreCode match the resource's storeId?"
permit( principal in MyApplication::Group::"Store-Owner-Role", action == MyApplication::Action::"ManageInventory", resource is MyApplication::Application)when { principal.employmentStoreCode == resource.storeId};This gives you the best of both worlds: role-based grouping + attribute-based granularity.
Testing & Deployment
Once you have your policies in place, test them:
- As a
Customeruser: Can they SearchPets? ✅ Yes. Can they GetStoreInventory? ❌ No. - As a
Store-Owner-Roleuser: Can they GetStoreInventory for their store? ✅ Yes. For a different store? ❌ No. - As an
ownerwithemploymentStoreCode=petstore-london: Can they access orders for petstore-london? ✅ Yes.
If a policy isn't working, check:
- Are your entities structured correctly in the Lambda?
- Does the user's JWT contain the right
cognito:groups? - Is the custom attribute in the user profile?
- Do the entity types in your authorization query match your schema?
Conclusion: From Plumbing to Purpose
I wasn't planning to bring this post to showcase Amazon Verified Permissions as an ultimate golden bullet for your application, but if you're in the middle of a neverending process of adjusting the code of your role-based web application because those business requirements change so frequently, you might try to stop, zoom out and rethink what you're doing.
Maybe this service can help you save some time, resources and free your time to focus on business rather than plumbing. At the end it all looks like plumbing — it does support your application's business goals but doesn't really help to grow the value of it.
But at least with Amazon Verified Permissions, you're not fixing the plumbing every week.


