The three foundational elements needed to build a cost optimization culture in your company — and a step by step guide to building one with DoiT's products.
In many companies, cost optimization is almost always a panic response, occurring in reaction to some external event like the finance team getting bill shock or the need to reduce burn rate ahead of fundraising.
If this sounds like your company, you must begin fostering a more proactive approach across your company. Cost optimization shouldn’t be one person’s job. Every engineer and cloud user should care.
However, to get your cloud users to care, you must drive a sense of accountability and ownership of cloud costs among all your cloud users. That’s only possible by making your cloud users aware of their costs. And that’s only possible with proper cost allocation — the mapping of cloud costs to its owners.
YouTube
Tap to unmute
Error 153
Video player configuration error
Visit YouTube to search for more videos
When cloud users are aware of their costs, they begin to care more about them. They ask better questions about why their cloud costs are the amount that they are. And they’re empowered to act proactively, whether it’s factoring cost into feature design or preemptively addressing costs that are slowly climbing.
We’ll go over the three foundational elements needed to build a cost conscious culture in your company so that it becomes a continuous exercise across your cloud users.
Tip #1 - Match your resource hierarchy to your organizational structure
Ideally, your cloud resources should be organized in a way that matches your actual organization structure, and Google Cloud Folders or AWS Organizational Units (OUs) are a great way to set that up.
They’re used to separate and categorize resources for different departments/teams within your organization. Within these, you’ll have projects (Google Cloud) or accounts (AWS), with each of your workloads belonging to a single project/account.
YouTube
Tap to unmute
Error 153
Video player configuration error
Visit YouTube to search for more videos
Without this structure, expect challenges like resource sprawl, cost attribution issues, and complexities in access management.

This isn’t a new concept in computer programming. Conway’s Law suggests that the way teams communicate and are organized influences the products or systems they create. Similarly, in cloud computing, when you structure your resources in a way that mirrors your organization's setup, it can make management and collaboration much smoother.
Isolate your workloads into their own accounts/projects
Additionally, you must take care to isolate your workloads in their own AWS accounts or Google Cloud projects. Oftentimes we come across customers who have all their workloads in one account/project, or are sharing projects/accounts between multiple teams.
When you group unrelated workloads together in a single account or project, it becomes challenging to manage costs and track usage.
YouTube
Tap to unmute
Error 153
Video player configuration error
Visit YouTube to search for more videos
For example, imagine you have resources related to two different applications located in the same Google Cloud project. By not isolating resources into different projects/accounts, you become overly reliant on having perfect tagging hygiene (more on that in the next tip). And as your organization expands, this approach only adds complexity to attributing costs.
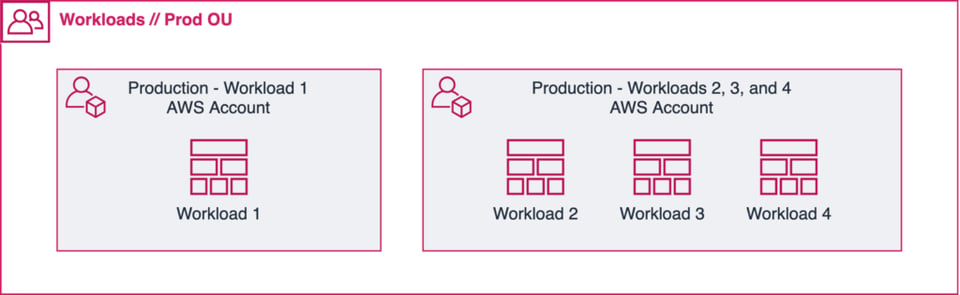
When possible, go with a single workload in a single account/project. However, sometimes when you have small workloads that are similar to each other in terms of scope, you may want to put them all in the same account (see illustration below).
Again, this idea isn’t new if you’re a programmer. Isolating cloud workloads into separate accounts or projects aligns with the programming principle of “ loose coupling”, which refers to designing components or modules that are independent and interact with each other with minimal dependencies.
By segregating workloads into distinct accounts or projects, you create independent environments that have minimal dependencies on each other. The benefits go beyond easier cost allocation — you also benefit from built-in operational security features like permission structures and rate-limiting by separating your workloads.
Tip #2 - Tag and/or label your resources
Tags (AWS, Azure) and Labels (Google Cloud) are used to provide fine-grained information around your cloud resources.
Use cases include:
- Billing enrichment (ex. adding cost center information to a resource)
- Environment/application classification (ex. specifying data-security levels)
- Automation (ex. determining reboot schedules)
Focusing on the first use case, tags and labels play a crucial role in cost allocation and tracking.
Tags help you categorize resources among environments, teams, and more, and provide a clear delineation of resource usage across those defined categories. Combined with well-defined accounts, having tags makes it easier to customize reporting to specific teams, applications, and more, thanks to more specific filters you can apply.
YouTube
Tap to unmute
Error 153
Video player configuration error
Visit YouTube to search for more videos
Rules of thumb for tagging cloud resources
With tagging, it may be tempting to define a highly-detailed structure with many different tags that should be applied to every resource. While this level of tagging is admirable, it’s unrealistic when getting started. We recommend starting small, and using 2-3 tags only, but being very strict on enforcement of these.
The three absolutely required tags (in our opinion) are:
- Application name (ex. “app_name”)
- Team (ex. “team”)
- Stage/environment (ex. “env”)
Being as tags are case sensitive, we recommend adopting a naming standard, such as snake case, to avoid having duplication of tags. The names can, of course, be changed to suit your company culture, but should be descriptive and clear. In this case, “app_name” refers to a microservice or workload name, and “env” is a development stage, such as “development”, “testing” or “production”
Values for both fields should ideally come from a relatively standard list. Again, if you have users tagging their resources with variations of “Website - Backend”, it could lead to problems analyzing the data.
One example where tags will help you better understand your cloud consumption is when there’s a ‘shared resource’ account within an organization and all the database resources (which are used by multiple teams) are located there. For each database you can assign a tag or label that determines which team should be charged for usage of that resource.
We cover more on this in our Resource Labeling Best Practices blog post.
Tip #3 - Set up real-time reporting and custom alerting
It’s all well and good to define a well-organized cloud resource hierarchy and tag resources, but if you’re not giving your cloud users real-time reporting and alerting with this segmented data, what’s the point?
The “Prius Effect”
In "Cloud FinOps" by O'Reilly, the authors explain the "Prius Effect," drawing parallels between real-time reporting's impact on engineers' cost-conscious behavior and driving a Prius.
When driving a Prius, you’re given real-time information about your energy consumption and the time it’ll take for your battery to run out. Step down hard on the accelerator, and you’ll see the increase in energy usage and subsequent reduction in the time-to-empty for your battery. This information may lead to more sensible driving. Or you may decide that because you’re in a hurry, accelerating is worth depleting your battery of energy faster.
Regardless of what you do with the information, the point is that you’re now making a more informed decision with data that you didn’t have before.
Real-time reporting empowers decentralized, informed decision making
Real-time cloud cost reporting, like a Prius displaying your fuel consumption’s impact on battery life, gives immediate insights, empowering cloud users to independently make informed decisions on the parts of infrastructure that they’re responsible for.
And while a shift toward being more cost conscious doesn’t happen overnight, real-time reporting influences behavior toward more cost-efficient decisions in the future.
It should come in the form of cost and usage reports, dashboard(s), budgets, and other custom alerts that deliver information relevant to the cloud user examining it. Meaning any report that a cloud user is looking at should be filtered (using some combination of your tags and relevant account(s)) to display only consumption that they and/or their team are responsible for.
Driving a cost-conscious culture with DoiT
Digital native organizations use DoiT’s portfolio of products — along with its global network of cloud expertise for FinOps and infrastructure support — to enable informed decision making about their cloud usage.
Here’s a step-by-step guide on how many DoiT customers drive a culture of cost awareness and accountability across their engineering teams.
Map cloud costs to your business categories
The first step to performing cost allocation is to define the business groupings you want to allocate costs to. In DoiT Cloud Intelligence™, you do this using Attributions. Attributions help you to group cloud resources together and organize costs in a way that reflects how you want to allocate.
Below are two examples of using Attributions to map costs to different business-specific categories.
In the first one, we define an application’s costs by grouping three different AWS accounts together.
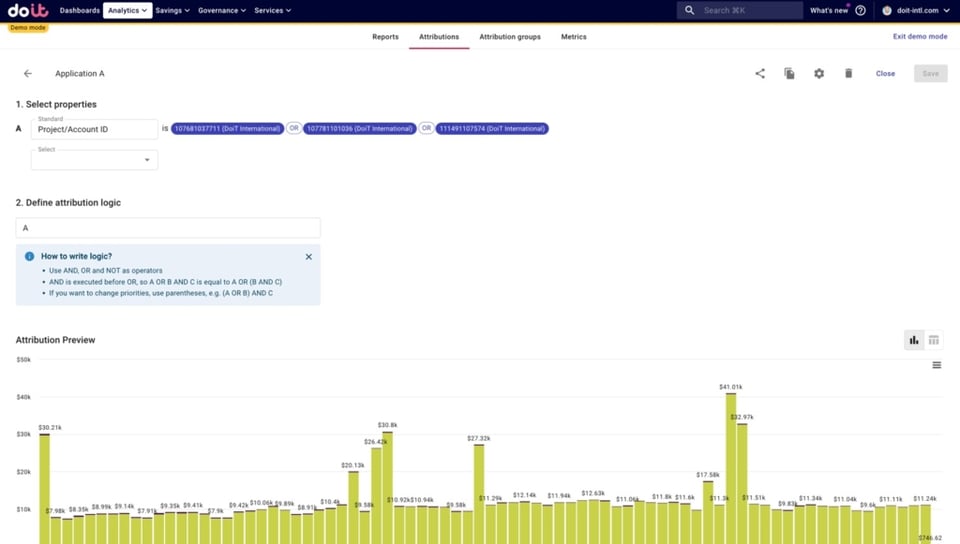 Mapping cloud costs for a hypothetical application
In the second, we’re defining a product engineering team’s (in this case, “Team Bruteforce”) costs as any resource with a “team” Label or Project Label value of “bruteforce”.
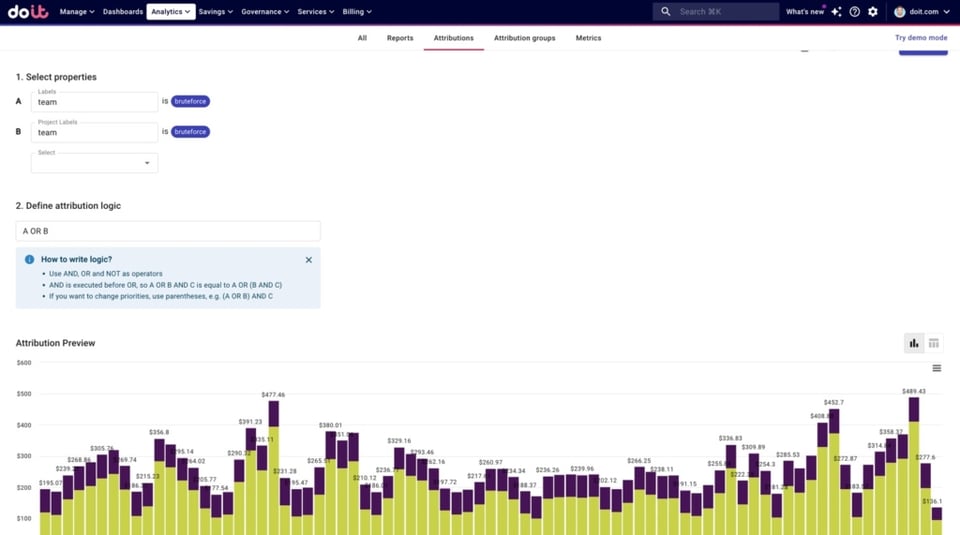
Mapping cloud costs for a hypothetical engineering team
Create real-time reporting and dashboards
You can then use Attributions in Reports — and eventually Dashboards — to filter for consumption specific to a team, environment, app, or whatever you end up defining with Attributions.
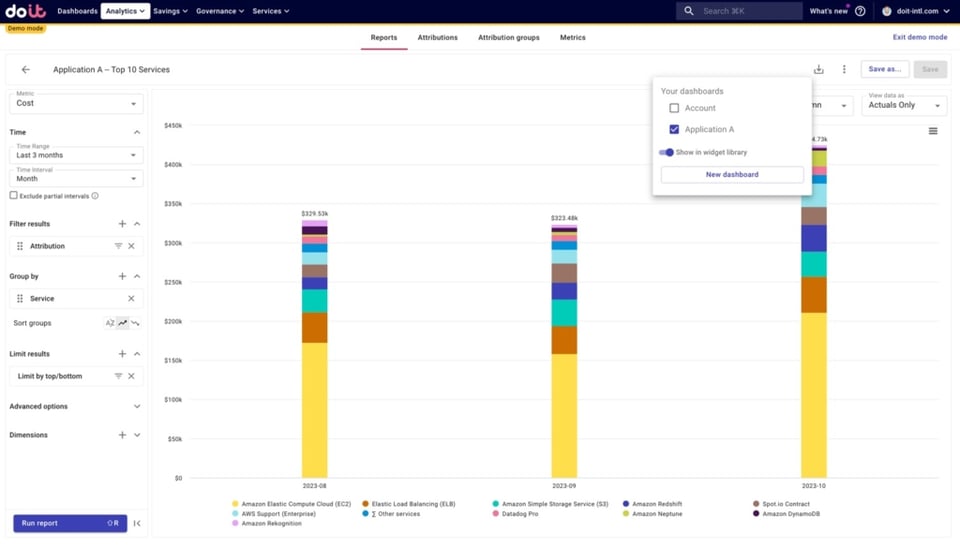
For example, below we’ve used our “Application A” Attribution as a filter, breaking down those costs by service, and displaying only the top 10 in terms of cost.
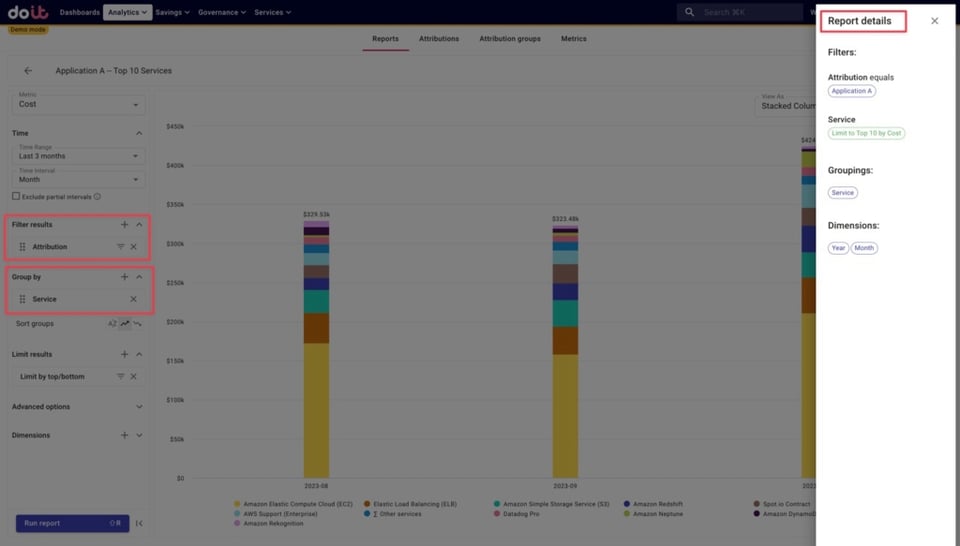
A cloud cost report breaking down costs for an application defined using DoiT Attributions
You can then choose to schedule this report to be refreshed and delivered on a recurring basis to the cloud users it is relevant to. This is a simple way to start making people more aware of their impact on cloud costs.
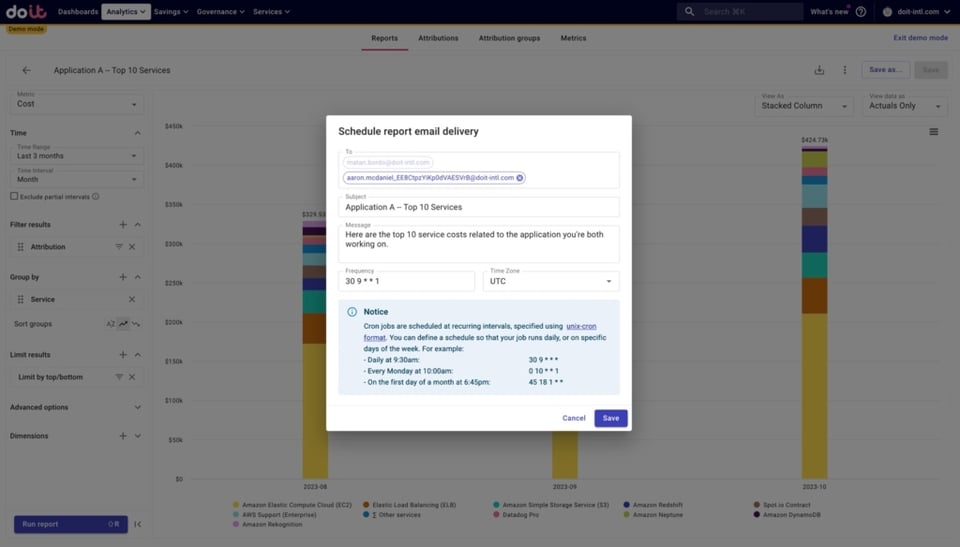
Scheduling a cloud cost report to be delivered on a recurring basis
Additionally, you can also start creating a dashboard specific to a team or app, allowing relevant cloud users to obtain a comprehensive view of their costs. Below, we’ve added our “Application A - Service Cost” report to a new dashboard we’ve created that will contain other reports related to this application’s consumption.
Adding a cloud cost report for an Application to a dashboard containing other reports on that Application.
The dashboard below is an example of what you can create for your team, in addition to scheduling specific reports to the cloud users they’re relevant for.
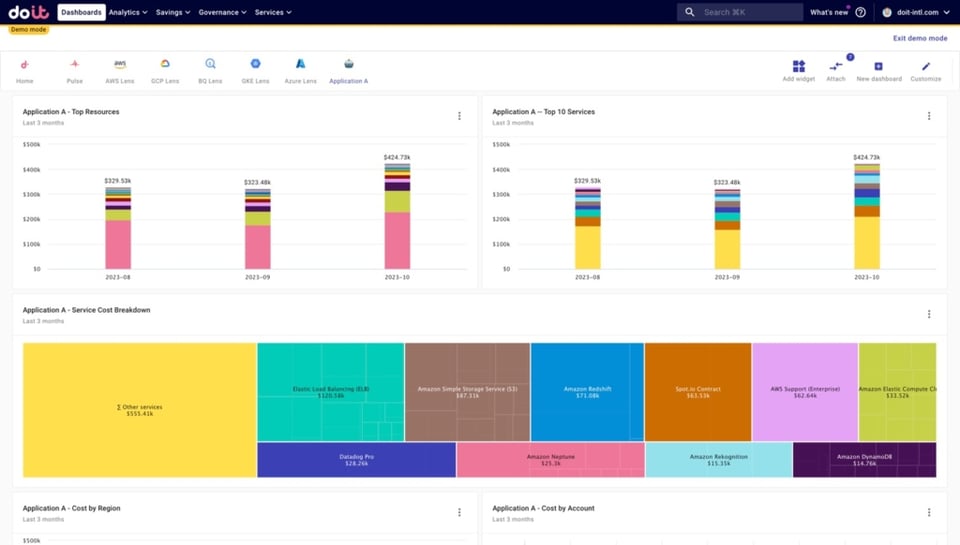
Dashboard containing custom cloud cost reports around a specific Application
Custom alerting and targeted Anomaly Detection
Beyond reports, timely alerts that inform users when they should take a closer look at a certain aspect of their cloud spend can also help improve awareness and accountability.
Set up granular cloud cost alerts for stakeholders
For instance, DoiT customers set up Alerts when they want stakeholders to be aware of usage at more granular levels.
Below we’ve set up a cost alert, scoped to our “Application A” Attribution. From the way it’s set up, we will be alerted whenever the cost to serve any customer — as defined by selecting the “customer” tag in the Evaluate for each dropdown — increases by 25% or more, week over week. The Evaluate for each dropdown is very useful for when you want to evaluate each instance of the same dimension separately (i.e. each of your K8s namespaces).
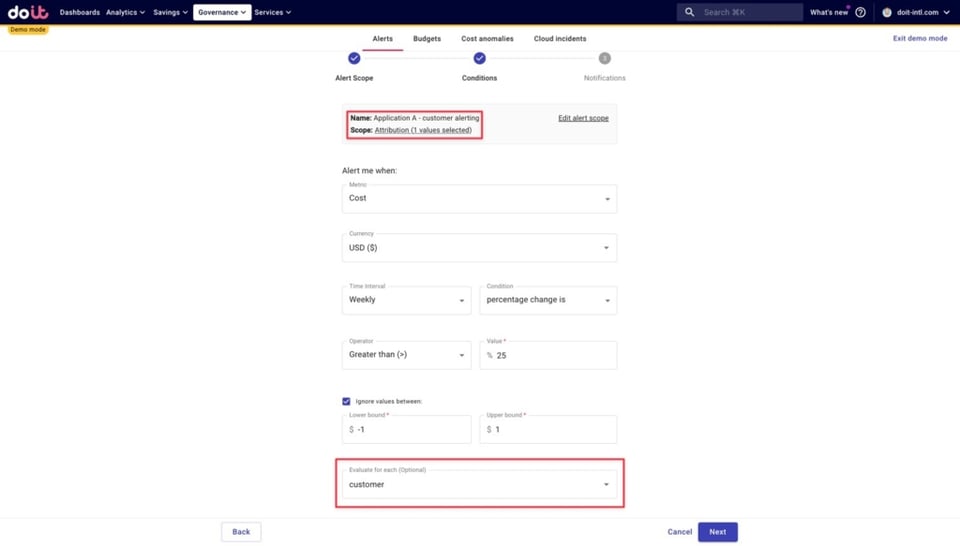
An alert which notifies us whenever the cost to serve any customer — as defined by selecting the “customer” tag in the Evaluate for each dropdown — increases by 25% or more, week over week
Set up targeted Anomaly Detection
DoiT Anomaly Detection works by autonomously monitoring for cost spikes, alerting you when anomalous spend is detected so you can minimize their impact on your bill. By default, it looks for abnormal behavior for each SKU, across each account or project you have.
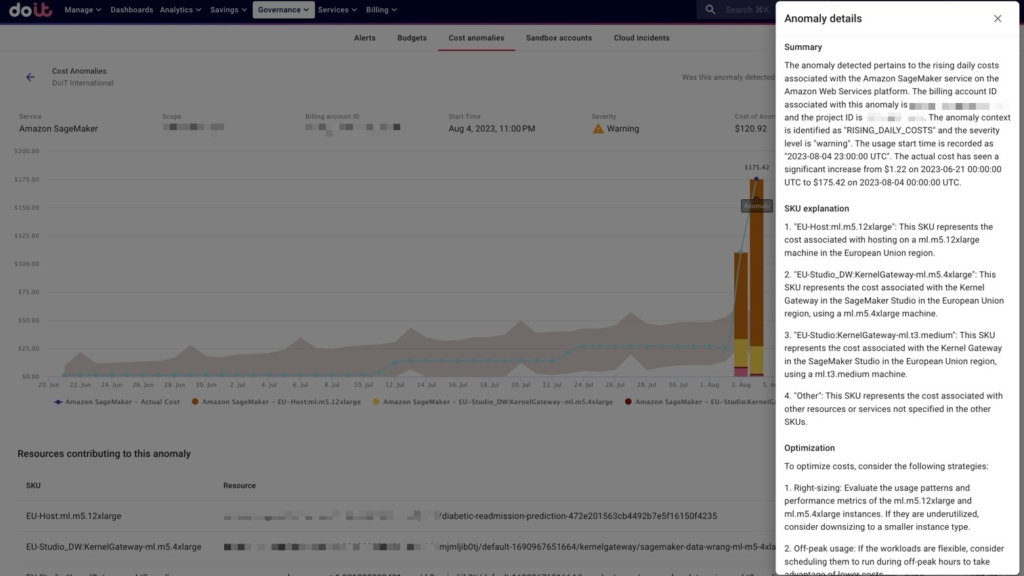
Example anomaly detected for the DataTransfer-Out-Bytes SKU of AWS S3
Anomaly detection systems typically provide insights on your entire organization's cloud usage. However, this broad approach often spams teams with notifications that are not directly relevant to their operations.
But with DoiT Anomaly Detection you can subscribe cloud users to anomaly alerts specific to the costs they’re responsible for, using Attributions. This takes anomaly alerting a step further, enabling your teams to fine-tune the anomaly alerts they receive, focusing only on the cloud costs that they’re accountable for.
Once an Attribution is created, you just have to toggle on Anomaly Detection for it.
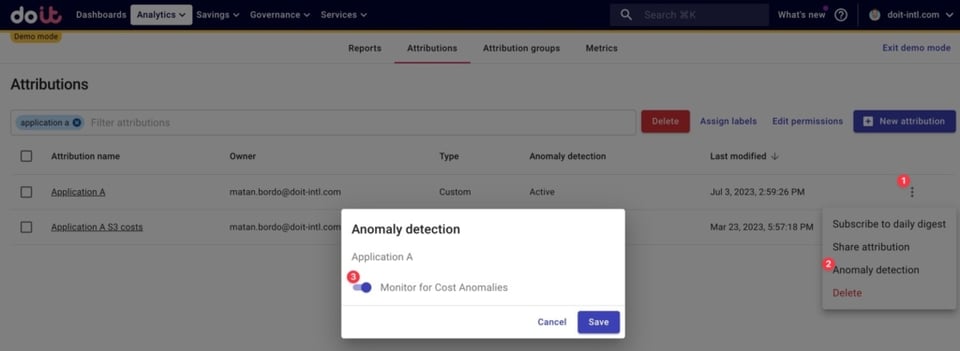
Toggle Anomaly Detection for a specific Application's cloud resources
Then you can go into the notification settings for the people responsible for Application A and subscribe them to alerts related to that Attribution (or they can do it themselves).
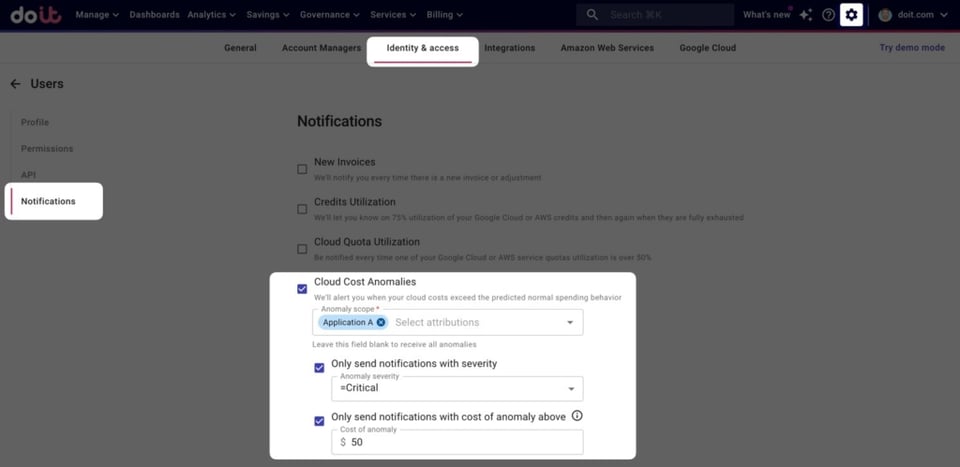
How to subscribe to anomaly alerting for a specific Attribution
Setting up a cost-conscious culture across your company isn’t as easy as simply telling your cloud users to start caring more about costs. You need to give them the data that makes them aware of the costs of their work.
And to deliver the most precise data on each person or team’s impact on the cloud bill, you need to align your resource hierarchy with your org structure, set up appropriate tags, and tag your resources with those tags. However, the true power lies in pairing these foundational steps with real-time reporting and alerting mechanisms.
You can accomplish both with DoiT, first by working with our FinOps experts to define tags you should create — if you haven’t created them already — and a resource hierarchy that makes sense given how your company is structured.
Once that’s established you can use DoiT’s products to deliver relevant, real-time reporting and alerts to your cloud users.
If you’re a DoiT customer already, you can follow what we’ve described above step-by-step in DoiT Cloud Intelligence now. If not, get in touch with us to see how you can leverage DoiT’s products and consulting services for any phase of your cloud journey.