How to set up a direct, encrypted connection between Google Cloud and your on-premise network.

For a number of years now Ubiquiti Networks has sold networking products for homelabbers, prosumers, and businesses in its UniFi line. Being very reasonably priced for very feature-rich components has made them the go-to choice for many small and medium-sized businesses for their networking needs.
In the midst of many businesses moving to the cloud, needing a direct and encrypted connection directly from their on-premise datacenter or back-office to the cloud is a very common use-case.
Google Cloud Platform has been the go-to for many small and mid-sized businesses for their cloud presence due to the low cost and feature-rich environment Google has created. Unfortunately, when running a router such as the UniFi Security Gateway or a UniFi Dream Machine series, there is not much in the way of documentation on how to connect it directly to GCP compared to AWS or Azure.
Laid out below is a step-by-step guide on setting up a site-to-site VPN between a UniFi-based network and GCP.
Prerequisites
First, there are three prerequisites that need to exist before starting this process.
- On the on-premise networking side, you will need a UniFi router such as the UniFi Security Gateway (or USG), UniFi Security Gateway Pro (or USG3/USG4), UniFi Dream Machine (or UDM), or the UniFi Dream Machine Pro (or UDM Pro/UDMP). You will also need a UniFi controller setup and connected to your router. In the case of the latter two router products, the controller is hosted inside the appliance itself.
- You will also need a static IP address for your connection. If you do not have one then contact your ISP as they can usually attach one to your connection for a small fee.
- On the GCP side of things, you will need to have a project in which your user has at least Network Management Admin IAM privileges.
Information Gathering
Like the beginning of every great investigation into the unknown, there is some information you will need to gather ahead of time for implementing this. Go ahead and get a text editor open to jot down some values needed for later steps.
The first piece of information is very easy: your static IP address.
- The easiest method is to Google “my IP” and it will appear right at the top of the search results from a machine on the same network. If you are not on the same network consult your administrator or ISP to acquire this IP address.
- Put this into your text editor and label it Static IP Address for later.
The second piece of information you will need is the subnet IP address range for your on-premise network(s) that you plan to connect to GCP.
- To do this you will need to login to your UniFi controller with an admin account.
- From there go to the Settings menu (sprocket on the lower-left corner) and into the Networks page.
- Find the networks you will be connecting to and take note of the information in the subnet column.
Note that you can have more than 1 network chosen here. - Put this into your text editor and label it On-Prem Subnet for later.
Here is an example in this screenshot. In the following screenshot I want to connect the Gaming and Home Devices networks to GCP, so I will save aside the following IP ranges in CIDR notation for later: 10.4.4.0/24 and 10.2.2.0/24.

Leave this page open in a tab for later as well because we will return to it.
The last piece of information you will need is the subnet IP address range for the region you will be connecting to in GCP. You will need to have a little knowledge of what’s in your project and what region it runs in for this.
To acquire this you will need to login to the GCP console:
- Click the main navigation menu in the upper left corner (3 bars icon) and go to VPC network -> VPC networks.
- On the screen that pops up will be one or more networks with a table of subnets in different regions. This can look different for every project depending upon the network design, so I will assume you are using the default network design that GCP provides.
- What you are looking for is the region where your resources live, most of the time this is us-central1 but can vary depending upon the network and infrastructure design.
- Once the correct region is determined take note of the value in the IP address ranges column.
- Put this in your text editor and label it GCP Network Range.
Leave your GCP Console open in a tab as you will be using it for the next set of steps in this process.
That’s all you need for getting this setup, it’s now time to dive in and implement this.
Implementation
GCP Setup Pt. I: Configure VPN Gateway
Now we will go through the setup of GCP’s VPN service.
- Open up the GCP Console tab.
- Click the main navigation menu in the upper left corner.
- From there navigate to Networking -> Hybrid connectivity ->VPN.
- Click the Create VPN connection button on there and it begins.
- For now, select the Classic VPN selection.
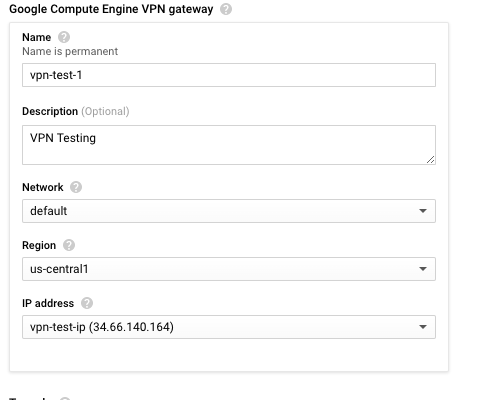
Compatibility note: This mode is only a single VPN and does not provide redundancy in case a VPN connection fails. The reason for this is because high-availability VPN requires BGP support. The UniFi networking equipment doesn’t at the time of writing this support BGP. - Once on the creation screen in the top section for the VPN gateway, put in a descriptive name and description.
- Next select the network you wish to use.
Most of the time this will be the default auto-generated network named default, but if you did a custom networking scheme choose the proper one. - Do the same for the region. Lastly select an existing external IP address or create one.
Here is a screenshot showing a properly configured VPN gateway example inside of the GCP console.

GCP Setup Pt. II: Set up the VPN Tunnel
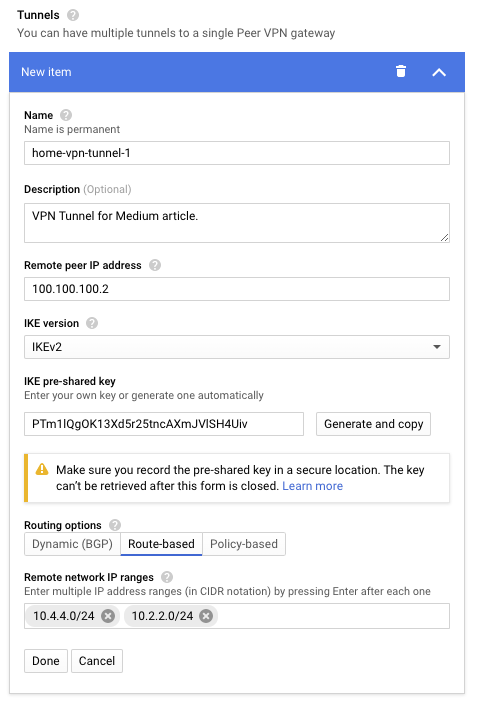
The second section of the page is for the actual VPN tunnel which is the mechanism that will connect between GCP and your on-premise network.
- Go ahead and scroll down to the second section on the page labeled VPN tunnel.
- Fill in a descriptive name and description.
- In the Remote peer IP address field fill in the On-Prem Subnet value(s) from your text editor.
- Ensure the IKE version field has a value of IKEv2.
- Next, click the Generate and copy button.
- Place this value in your text editor labeled as IKE Key.
Important note: Do not lose this value as once this page is submitted it will never accessible again inside of GCP. - Lastly click the Route-based tab in the last section.
- Inside of the Remote network IP ranges box fill in the On-Prem Subnet value(s) from your text editor inside of the UniFi controller, making sure to hit enter after each set so that they become a “box.”
- Verify that your values look similar to the following screenshot following these steps.
- When verified hit the Done button on this pane and the Create button at the bottom of the page.

At this point it will redirect you to the pages showing the status of the VPN Gateways and tunnels. It will take a few minutes to provision the services.
Once the service has completed provisioning there are a few last steps to finish the GCP configuration.
- Once the tunnel says First handshake with a yellow exclamation point next to it as the status then you are ready to continue.
- An IP address will appear under the Cloud VPN gateway column.
- Jot that down into your text editor labeled Cloud VPN IP.
- Before continuing on make sure to keep the GCP console open in this tab for the time being as you will be coming back to this page later after setting up the UniFi device.
UniFi Setup
Since the GCP side has been configured and has an active VPN tunnel and gateway setup waiting for a connection, we will get set the UniFi device up to complete the on-premise side of the VPN connection.
- Open the UniFi controller tab back up.
- Click the Site option on the main navigation bar on the left.
- On the Site page under Services is a checkbox called Enable advanced features which needs to be checked.
- If it’s not checked then check it and hit Apply at the bottom. This will display a warning which can be disregarded at this point.
- Now click the Networks page to return back to the network listing. Press the Create New Network button at the bottom of the page.
- There are some options on this page that must be set so I will list those out first then go back to what goes into each box.
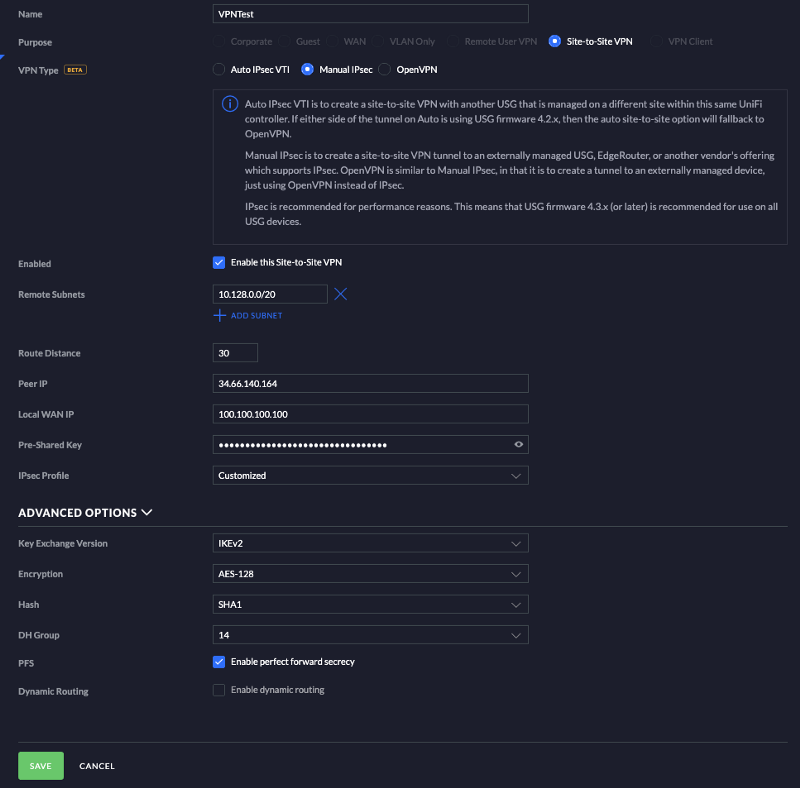
- Under Purpose select Site-to-Site VPN. Select Manual IPSec for VPN Type. Expand Advanced Options and change Key Exchange Version to IKEv2.
- Leave everything else as the default value for now.
- First input a name for the network.
- Hit the Add Subnet button and in the field that appears input the GCP Network Range value from your text editor.
- Put the Cloud VPN IP value from your text editor into the Peer IP field.
- In the Local WAN IP fill in the Static IP Address from your text editor.
- Last on this page paste in the IKE Key from your text editor. Before hitting save verify that your page looks like the screenshot below, but with your values inputted.

Lastly in the UniFi controller, a static route needs to be created so that traffic can be routed over this VPN connection.
- Select the Routing & Firewall page in the main navigation pane.
- Click the Create New Route button.
- Input a name for this route.
- Enter in the GCP Network Range value from your text editor into the Destination Network field and set the distance to 1.
- For Static Route Type select Interface and select the network name created earlier in the Interface field.
- Hit Save and you are ready to test this.
If you checked Enable advanced features above, then proceed to the following to disable it if you do not wish to keep this mode active.
- Click the Site option on the main navigation bar on the left.
- Under Services uncheck the checkbox called Enable advanced features.
- Click Apply at the bottom of the page and it will be disabled once again.
Verification of Connection
At this point the VPN connection should be completed and connected. Follow these steps to verify the connection is connected as it should be at this point.
- Switch back to the GCP console tab.
- In case you changed the page on that tab from the main navigation menu navigate to Networking -> Hybrid connectivity ->VPN.
- Click the Cloud VPN Tunnels tab on that page.
- Under the VPN tunnel status column in the table on that page it should contain a green checkbox next to a message saying Established.
Note this may take a few minutes to connect, so you can use the Refresh button at the top to refresh the data until this appears. - If this looks good then the VPN is connected between GCP and your on-premise UniFi device.
At this point we have verified the VPN is connected, but in order to ensure that the connection is working properly we need to perform a simple test.
Testing Connection
- Ensure you have the GCP Console page opened.
- In the main navigation menu navigate to Compute Engine -> VM Instances.
- If you have not created any Compute Engine instances or do not have any inside of the region your VPN is located in from above please follow this great guide from GCP’s Youtube channel to create a temporary instance for testing and ensure that the region you create it in is: https://www.youtube.com/watch?v=1XH0gLlGDdk
- In your list of Compute Engine instances find an instance that is located in the region you created the VPN in above. The default on this will be us-central1.
- On that instance located the value inside of the Internal IP column.
- Open up a terminal window.
- Run the following command substituting in the internal IP from the previous step:
ping <internal IP>
This command should start showing lines of text saying bytes received from that IP address and latency time. If you received this then your VPN is connected and you are good to go. Congrats on getting this going as this is not the easiest of processes to do.
Otherwise, if you have issues follow the next section for some troubleshooting tips.
Troubleshooting
If you are experiencing issues then here are a few troubleshooting tips I discovered when writing this:
Stackdriver logs are your friend. Many times issues will appear in the logs for the VPN Gateway or the VPN tunnel showing that gives clues as to what is causing the VPN connection to fail.
I recommend you check that the static route on your UniFi controller to make sure that the values are correct.
Sometimes your local machine may cache ICMP routing tables. I rebooted and it fixed this.
Check firewall rules inside of GCP and the UniFi controller to ensure that communication between internal nodes is not blocked. Remember over VPN that it will be communicating with private IPs into GCP.
The UniFi controller is simply a Linux machine that can be accessed over ssh and have any basic commands run on it. In the controller on the General page, there is an option to turn this on and off as well as setting credentials. From the controller, you should be able to ping or traceroute the internal GCP IPs.
Ensure that your static IP is set up properly and is assigned on the router.
Make sure you are always using the internal GCP IPs to test and not the external IPs as this will not route the traffic over the VPN tunnel.


