Are you interested in learning how to securely and (relatively) easily register millions of IoT devices to your cloud environment, properly store their high throughput data streams, and engage in downstream visualizations, all with complete code examples? Then let’s jump right into it! This article will cover the full workflow from IoT device authorization to data streaming, with storage and visualization covered in a follow-up article. We will use AWS as our cloud provider and Raspberry Pi’s with temperature sensors as IoT devices.

Overview
This discussion is broken up into the following sections:
- Raspberry Pi software and hardware setup
- Overview of how to provision device-unique credentials
- Hands-on creation of a provisioning template and bootstrap certificate
- Device connectivity testing and streaming of temperature data
- Storage of streaming data (Covered in Part 2)
- Visualization of streaming data (Covered in Part 2)
There is quite a lot to cover, so let’s get started! To get through this article you only need basic experience with Bash and Python, a basic understanding of how to navigate the AWS web console, and a large cup of coffee to keep you going through this extended walkthrough.
Raspberry Pi Software and Hardware Setup
First, get several Raspberry Pi devices up-and-running (I will be using Pi 3 devices). I recommend using the Raspbian OS Imager to automate the OS install on microSD cards. Once you have reached the desktop and updated your device, run the following command to install the AWS IoT-specific SDK:
pip3 install -U awsiotsdk
It is important to understand this package before moving forward:
1. Why is the IoT SDK separate from the general-use boto3 SDK? Boto3 is HTTP-based, a protocol that is useful for quickly executing most AWS actions. However, HTTP is not a suitable protocol for sending messages over long-lived connections with a high likelihood of intermittent connectivity, wherein data primarily flows away from the connecting device. MQTT, the protocol used by the IoT SDK, is designed specifically for the IoT use-case as it greatly simplifies enabling a device to frequently publish messages and infrequently receive messages despite connectivity challenges.
2. The ‘awsiotsdk’ package represents v2 of the AWS IoT SDK. It is a separate entity from the similarly named v1 ‘AWSIoTPythonSDK’ package. Nearly all walkthrough articles published to-date on AWS IoT utilize the first version of the IoT SDK, and unfortunately v1 makes it more challenging to implement a production-scale approach to device registry. v2 also simplifies publishing and receiving messages, so we will be working with the latest version.
Now that your Raspberry Pi has the required AWS SDKs installed, you will need to connect a digital temperature sensor to it. I recommend using this DS18B20 sensor if you want to follow along with the article.
You will also need the following to connect the sensor to your Raspberry Pi:
Mini breadboards
Breadboard jumper wires
Assorted resistor kit (we need a 4.7K Ohm resistor)
If you have to wait a few days for these items to arrive, feel free to move along in the article; a script for streaming simulating temperature values will also be provided. If you have these items, the first five minutes of the following tutorial walks you through how to connect the sensor to your Raspberry Pi and validate it is receiving temperature values:
Raspberry Pi DS18B20 Temperature Sensor Tutorial
In addition to the process detailed in that tutorial, I recommend adding the following to /etc/modules to ensure the onewire modules are loaded on boot instead of running modprobe after every reboot:
w1-gpio
w1-therm
Overview of How to Provision Device-Unique Credentials
Among the various AWS IoT blog posts out there, most use v1 of the IoT SDK to walk through a toy example in which a single device is registered to a cloud account. The process described typically involves creation of a certificate with associated AWS IoT permissions, then placement of the certificate files on the device, enabling it to make IoT API calls that stream data to the cloud.
Such examples are not very applicable however, as real-world IoT use cases involve thousands to millions of devices streaming to a cloud environment. Each device in such a fleet should be given a unique set of credentials so that if a device or its AWS credentials become compromised and used for illegitimate purposes (e.g. streaming fake data to your platform), that credential set can be disabled without impacting other devices in the fleet.
How can the process of creating device-specific credentials be done as simply as possible? Can it be done without creating millions of certificates in advance and coordinating their unique placement on devices during manufacturing? Alternatively, can it be done without requiring the manufacturer to issue API calls to your environment to create a new certificate on-demand when a device rolls down the production line to be bootstrapped with software and credentials? These suggested methods should be avoided because they are complex, error-prone, and place an unnecessary burden on the manufacturer.
Thankfully there is a simple solution, one which v2 of the IoT SDK makes a bit easier to implement. Large-scale assignment of device-unique credentials can be accomplished by creating two entities in the AWS IoT console: (1) A fleet provisioning template, and (2) a bootstrap certificate to be placed on all devices. The workflow below explains the process:
- A single IoT certificate is created that will be placed on all IoT devices. This certificate, dubbed a ‘bootstrap’ certificate, is associated with a permissions policy that only allows a device to issue a request to (a) create a device-specific certificate and retrieve these credentials if the request is granted, and (b) add itself to the IoT Registry of devices. This request can optionally send a unique identifier for the device, such as a serial number.
- The AWS IoT platform, upon receiving the certificate creation request, will create a new certificate and deliver its associated files to the device. The IoT permissions associated with each new certificate, as well as various attributes related to your newly registered device, are based on a template you create which AWS calls the ‘fleet provisioning template’.
This template associates attributes with newly registered devices, for example{“DeviceType”: “RaspberryPi”}, and additionally enables all device-unique certificates to be associated with the same permissions policy that is nonetheless capable of defining device-specific permissions.
For example, a template’s single IoT policy for registered devices can be crafted to allow device name ‘sensor123’ to only publish messages to IoT topicsensors/temp/sensor123, device name ‘sensor456’ to only publish messages to IoT topicsensors/temp/sensor456, and so on. Stated another way, the fleet provisioning template’s permissions policy prevents you from having to create a new permissions policy for every new device and its certificate being registered. This approach to permissions also allows you to deploy permission changes to an IoT fleet via one policy update. - The process of creating a device certificate can optionally be gated by what AWS terms a “pre-provisioning hook”. This is a Lambda function you write that can require a unique identifier be provided in the certificate request so that it can be checked against a whitelist (e.g. a list of all serial numbers manufactured) and/or a blacklist (e.g. a list of serial numbers associated with compromised or abusive devices).
- If the request is approved, device certificate files are delivered to the device for use in data streaming, and the device is entered into the IoT Registry with the template’s attributes. The bootstrap certificate is no longer needed by the device.
With this workflow, an IoT device manufacturer simply has to provide each device with the bootstrap certificate. The device-unique certificate that allows for data streaming could be created and obtained immediately within the manufacturing plant if desired, or it could be created later when it is in the hands of the end-user. Regardless of when the credentials are obtained, the manufacturer would bootstrap software onto the device you provide which runs the fleet provisioning template-based certificate creation process every time the device boots up, an Internet connection is available, and a device certificate is found to be missing.
Hands-on example of fleet provisioning template and bootstrap certificate usage
I know the above is a lot of information to absorb; hopefully it will make more sense once you have had a chance to implement the process.
Shown below is a complete working example of how to set up your IoT Registry with devices added via a fleet provisioning template and a bootstrap certificate. We will then use the device certificates created to stream temperature data to the AWS IoT platform.
Start by navigating to the AWS IoT Core service. If you have not used this service then you will be greeted with a wizard page asking you to ‘Onboard a device’ or ‘Onboard many devices’. This will walk us through the fleet provisioning template process, but due to a quirk in this wizard we want to leave this screen and create the bootstrap certificate first.
From the left side of the screen navigate to Secure →Certificates and click “Create”, then choose “One-click certificate creation”. This will immediately create a new certificate which we will use as the bootstrap certificate. Make sure you download the certificate (cert.pem), the private key (private.key), and the root certificate authority (follow the Download link and save the AmazonRootCA1.pem file), then click ‘Activate’ to enable the certificate:
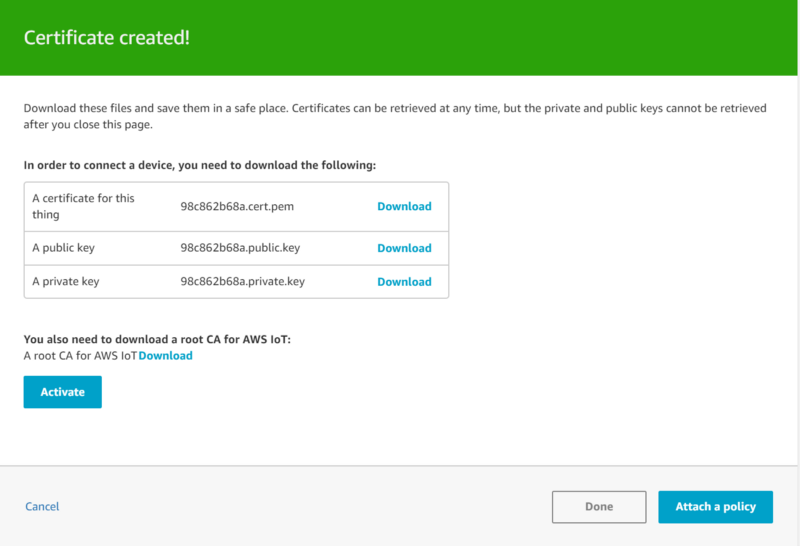
Once the certificate has been enabled and keys have been downloaded, click “Attach a policy”. We are going to create a policy that makes this become a bootstrapping certificate. From the “Add authorization to certificate” screen, click “Create New Policy”, and create a policy named “IoT_Bootstrapping_Certificate”. We will give this policy permissions to publish, subscribe, and receive messages to and from two AWS reserved topics used for the certificate creation and fleet provisioning template process:
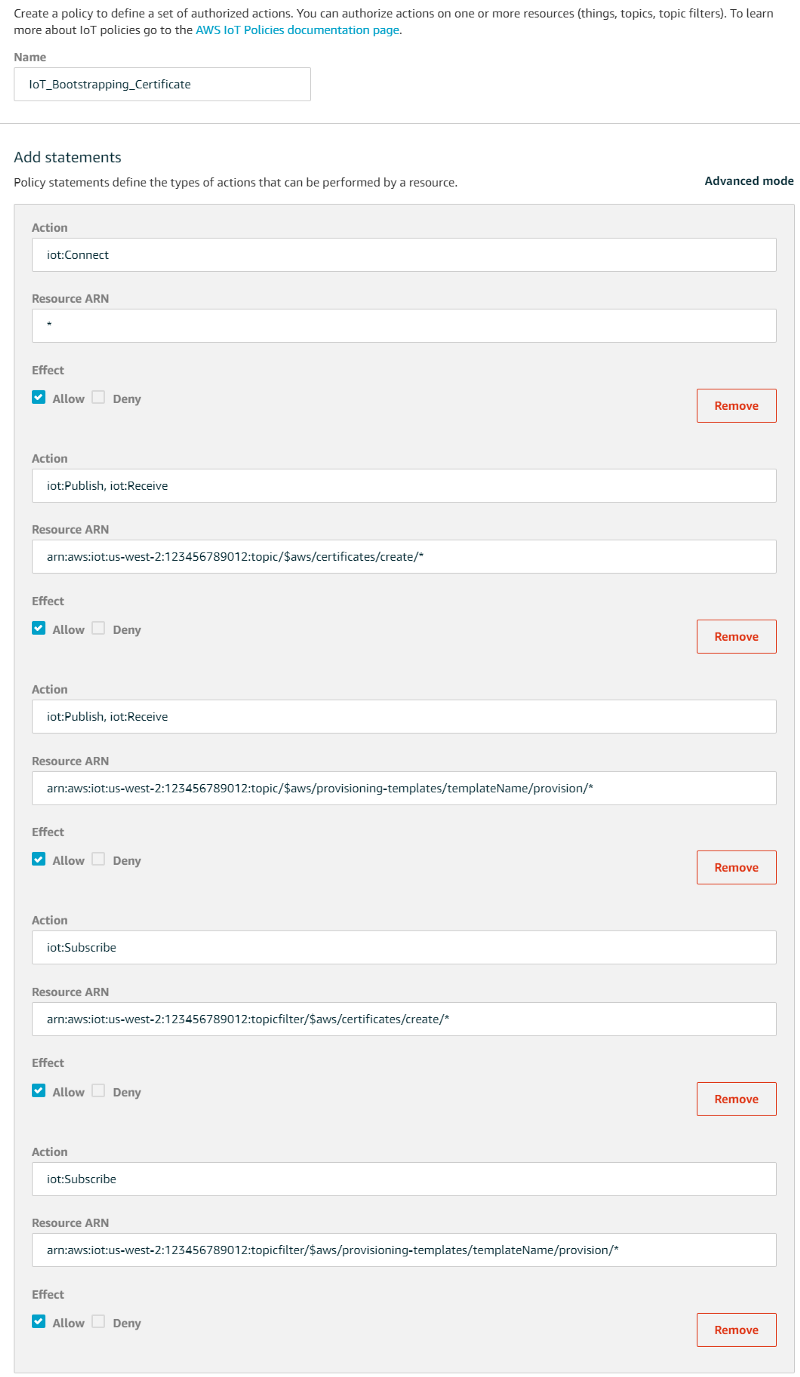
Action: iot:Connect
Resource ARN: *
Action: iot:Publish
Action: iot:Receive
Resource ARN: arn:aws:iot:us-west-2:123456789012:topic/$aws/certificates/create/*
Action: iot:Publish
Action: iot:Receive
Resource ARN: arn:aws:iot:us-west-2:123456789012:topic/$aws/provisioning-templates/SensorTemplate/provision/*
Action: iot:Subscribe
Resource ARN: arn:aws:iot:us-west-2:123456789012:topicfilter/$aws/certificates/create/*
Action: iot:Subscribe
Resource ARN: arn:aws:iot:us-west-2:123456789012:topicfilter/$aws/provisioning-templates/SensorTemplate/provision/*
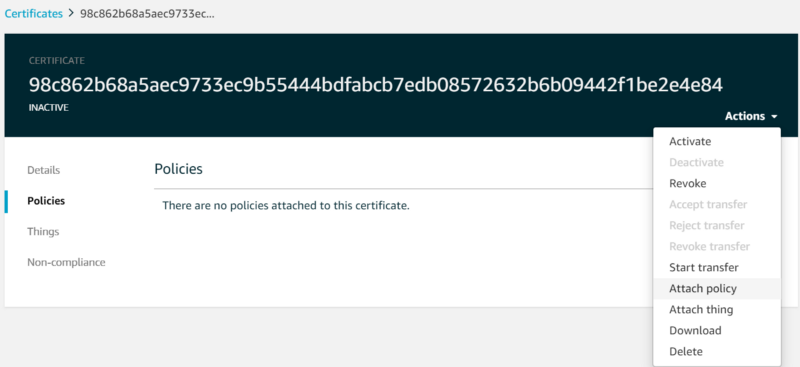
Click ‘Create’. Once the certificate policy has been created, navigate to the certificate you created and attach this policy:
Now that we have a bootstrapping certificate ready for our devices, let’s go back to the fleet provisioning template wizard. Reach this by clicking on Onboard →Get started.
From the wizard, choose “Onboard many devices”, then enter the following:
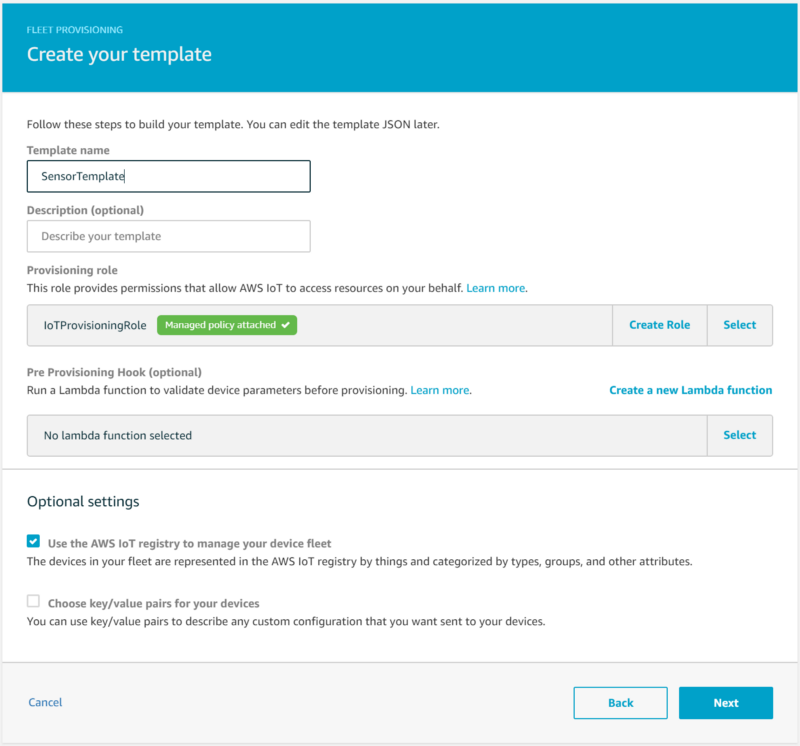
- Template name: “SensorTemplate”
- Provisioning role: Create a role titled “IoTProvisioningRole” and associate it with the AWS-managed “AWSIoTThingsRegistration” policy. This role allows the AWS IoT platform to register new devices when they connect.
- In a real-world scenario you would write a pre-provisioning hook Lambda function that validates a serial number before permitting the creation of a device certificate, but for the sake of brevity we will leave this option alone. You could for example use this to compare a serial number against DynamoDB tables of blacklisted and known serial numbers. A simple example of what this would look like is provided below:
def lambda_handler(event, context):
    serial = event["parameters"]["SerialNumber"]
    # Implement serial number validation functions
    if is_valid_serial(serial) and not is_blacklisted(serial):
        return {"allowProvisioning": True}
return {"allowProvisioning": False}
- Check the optional setting “Use the AWS IoT registry to manage your device fleet”. This will allow you to view associated devices in the IoT web console, as well as issue updates to the device’s state or software.
On the next page we will define an IoT policy associated with the template that gives our devices permissions to publish and receive messages from an IoT topic specific to the device. We will create the IoT policy using a thing policy variable. Thing policy variables allow devices to publish to or receive messages from an IoT topic that is unique to the device. In this example, devices will publish and subscribe to a topic based on BuildingName, Location (within the building), and ThingName:
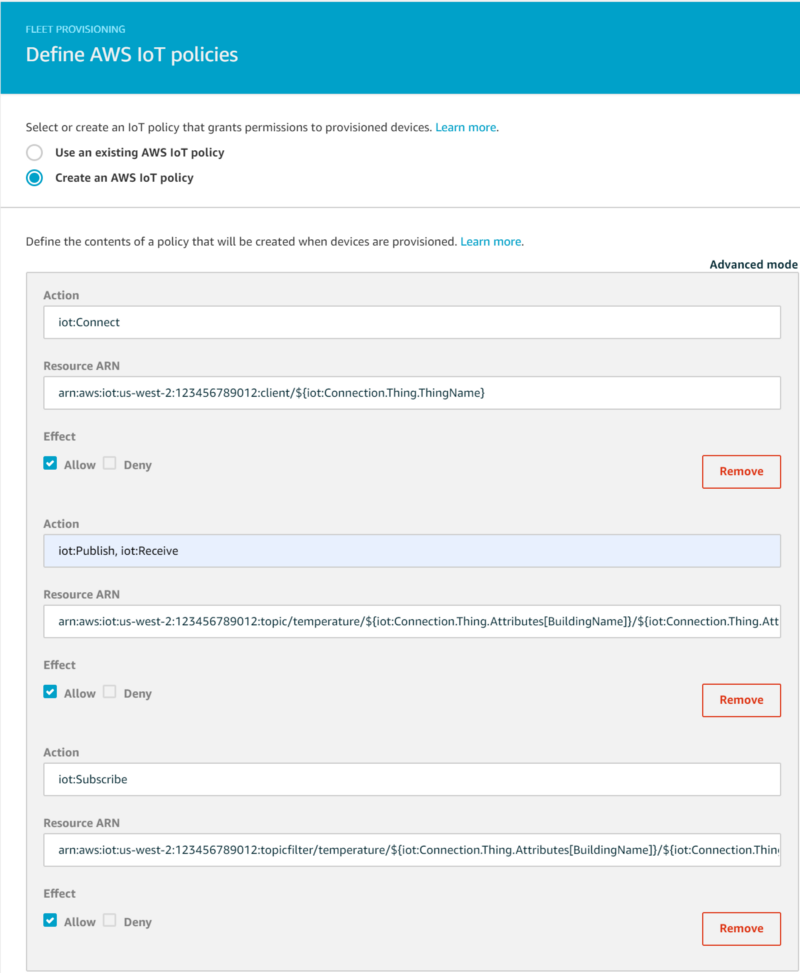
Action: iot:Connect Resource ARN: arn:aws:iot:us-west-2:123456789012:client/${iot:Connection.Thing.ThingName} Action: iot:Publish Action: iot:Receive Resource ARN: arn:aws:iot:us-west-2:123456789012:topic/temperature/${iot:Connection.Thing.Attributes[BuildingName]}/${iot:Connection.Thing.Attributes[Location]}/${iot:Connection.Thing.ThingName} Action: iot:Subscribe Resource ARN: arn:aws:iot:us-west-2:123456789012:topicfilter/temperature/${iot:Connection.Thing.Attributes[BuildingName]}/${iot:Connection.Thing.Attributes[Location]}/${iot:Connection.Thing.ThingName}
On the next page, define your AWS IoT registry settings — these are attributes assigned to each newly provisioned device:
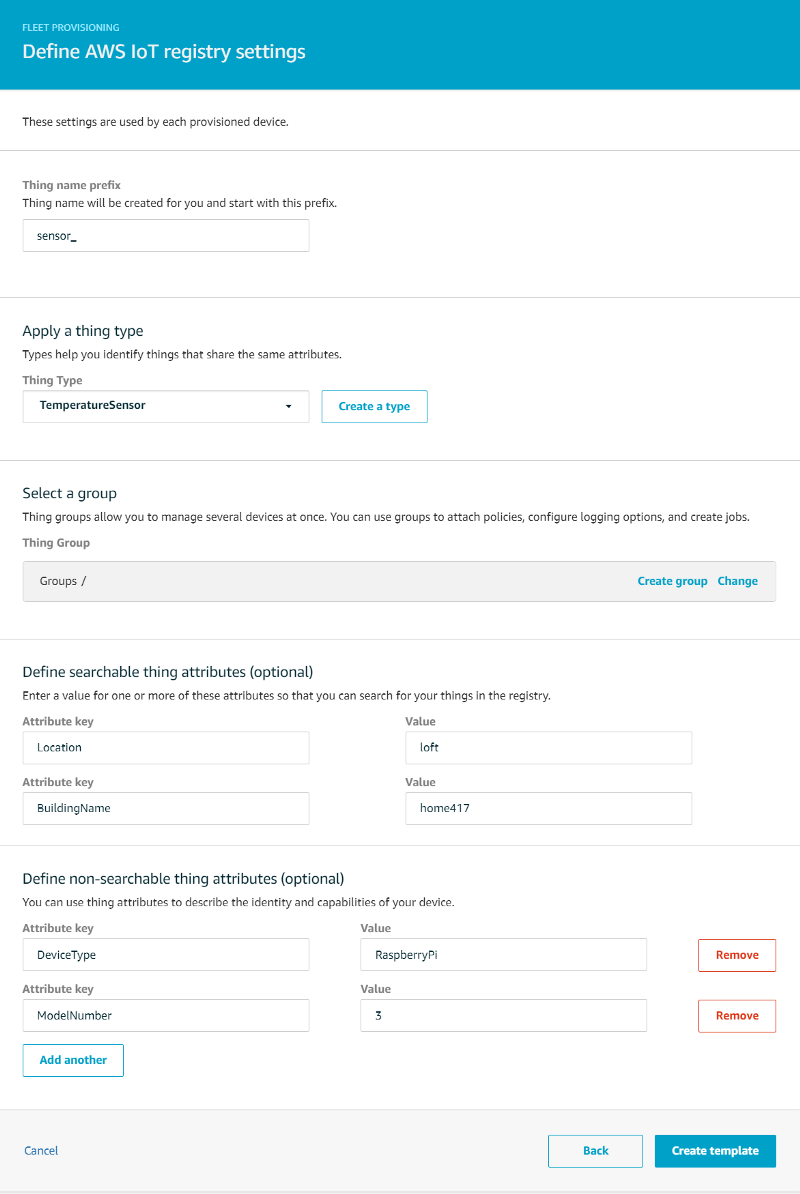
- Thing name prefix: sensor_
- Create a new Thing Type ‘TemperatureSensor’ with a Searchable Thing Attribute of ‘Location’ (e.g. ‘loft’, ‘downstairs’) and “BuildingName” (e.g. ‘home417’)
- Create the following non-searchable thing attributes: ‘DeviceType’ (e.g. ‘RaspberryPi’) and ‘ModelNumber’ (e.g. ‘3’)
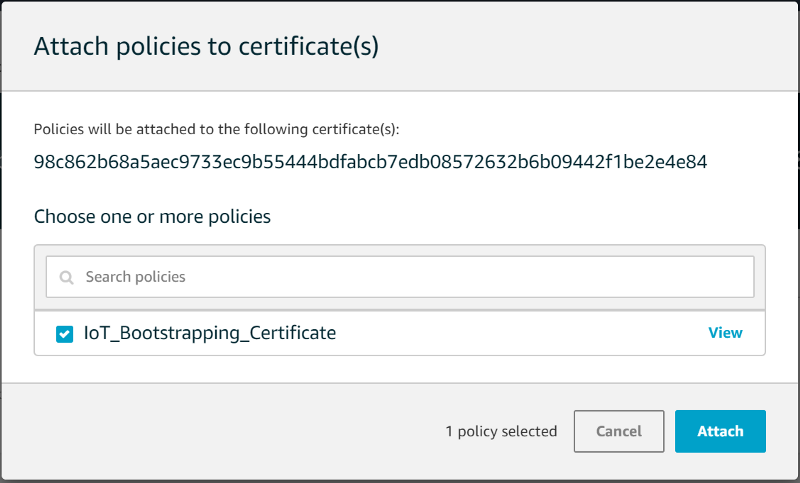
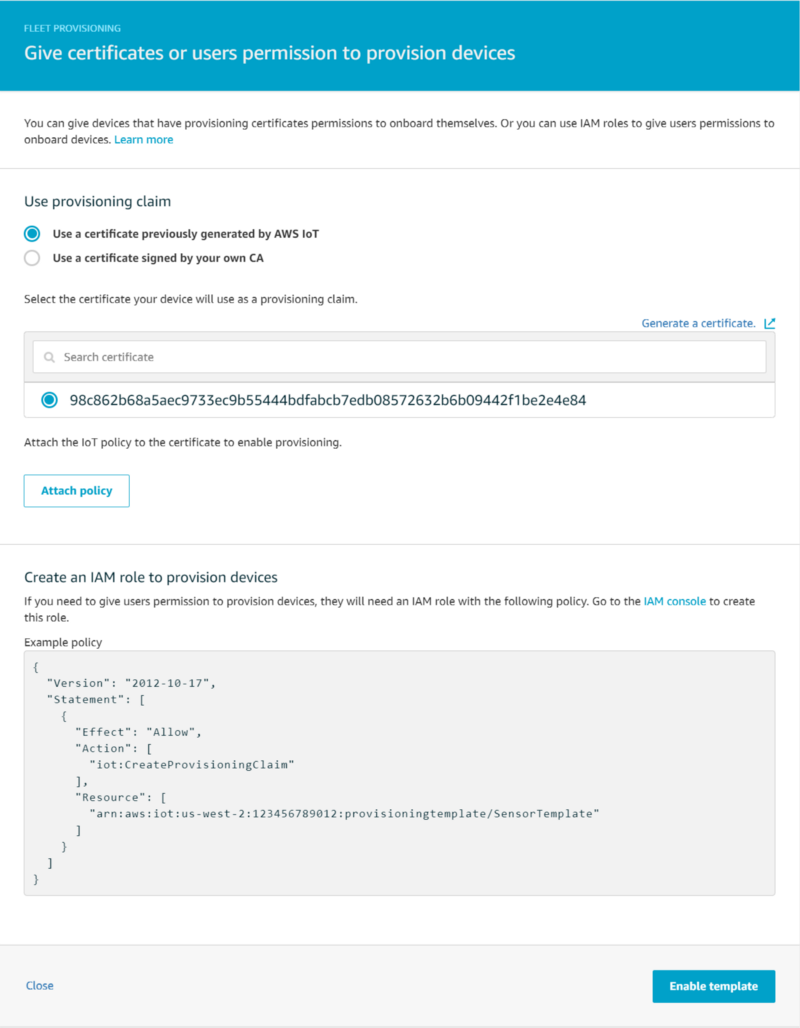
On the final screen after clicking “Create template”, select the bootstrapping certificate you created earlier and click “Attach policy”, then select ‘Enable template’. This association now enables devices using the bootstrapping certificate to use this template to be given a device certificate with the permissions required for publishing messages to a device name-specific IoT topic. In addition to obtaining a certificate, the device also uses the fleet provisioning template to enter itself into the IoT Registry and be assigned the attributes we defined.
To recap, we have just accomplished the following:
- Creation of a bootstrapping certificate which we associated with a policy that only enables a device using that certificate to make a request via a Fleet Provisioning Template for (1) a new device-unique certificate and (2) to be added to the IoT Registry with default attributes.
- Device certificates created for newly registered devices are associated with an IoT Policy that allows the device to publish to and receive messages from an IoT topic that is specific to that IoT device.
We are almost done with the IoT service prep work. All that is left is to update the fleet provisioning template to accept and require the searchable attributes be provided during the provisioning request. Navigate back to “SensorTemplate” and add the following to the template JSON:
# Add "BuildingName" and "Location" within "Parameters"
{
  "Parameters": {
    "SerialNumber": {
      "Type": "String"
    },
"BuildingName": { "Type": "String" }, "Location": { "Type": "String" },
    "AWS::IoT::Certificate::Id": {
      "Type": "String"
    }
  }
}
# Reference these attribute parameters within "thing": "Properties"
      "Properties": {
        "AttributePayload": {
          "DeviceType": "RaspberryPi",
          "ModelNumber": "3",
"BuildingName": { "Ref": "BuildingName" }, "Location": { "Ref": "Location" }
        },
        "ThingGroups": [],
We’ve made a lot of changes in the IoT console! Let’s now verify the bootstrapping certificate and fleet provisioning template are working with hands-on code examples.
Device connectivity testing and streaming of temperature data
Copy the certificate files you downloaded into a folder on your RPi devices, then create the config.ini file shown below with the appropriate values. In addition to updating the cert file paths, you will need to grab your account’s IoT Endpoint from the Settings page within the AWS IoT console:
[SETTINGS]
# Set the path to the location containing your bootstrap certificates (root, private, claim certificate)
SECURE_CERT_PATH = /home/pi/iot_certs/

# Specify the names for the root cert, provisioning claim cert, and the private key.
ROOT_CERT = AmazonRootCA1.pem
CLAIM_CERT = <YOURCERT>-certificate.pem.crt
SECURE_KEY = <YOURCERT>-private.pem.key

# Set the name of your IoT Endpoint
IOT_ENDPOINT = <YOUR_ENDPOINT>-ats.iot.us-west-2.amazonaws.com

# Set the IoT topic name
IOT_TOPIC = temperature/${iot:Connection.Thing.Attributes[BuildingName]}/${iot:Connection.Thing.Attributes[Location]}/${iot:Connection.Thing.ThingName}

# Set the IoT provisioning template name
PROVISIONING_TEMPLATE_NAME = SensorTemplate
Next, run the following script that uses your bootstrap certificate to obtain a device certificate (saved to iot_certs/permanent_cert/) and adds the device to the IoT Registry. With the -l parameter, define the Location attribute associated with where your device will be located in your home. For example:
./connect_rpi_to_iot_core.py -c config.ini -b home417 -l loft
There is a lot going on here, so I highly recommend you take the time to go over the code to understand the flow of IoT SDK API calls being made. If you set everything up properly, you will see the script exit with “Success” printed to the screen, a set of three certificate files within permanent_cert/, and a new perm_config.ini file in that folder for the device certificate files.
You will notice that as you add your RPi devices using this script, new certificates show up in the IoT console, and all of them are associated with the single IoT policy we defined in the fleet provisioning template allowing for message publishing and subscribing to a BuildingName, Location, and ThingName-based topic name.
Each device added by the script is registered with ThingName sensor_{UUID}, where UUID is a unique identifier provided by /etc/machine-id on the device. Thus, each device will publish messages to its own unique IoT Topic. In a real-world IoT scenario, you might incorporate the device’s serial number as its unique ThingName.
Let’s test our device certificates with simulated temperature values! Run the following script that (1) publishes random numbers to the device’s IoT Topic, and (2) subscribes to that same topic and prints the values back.
./pubsub_simulated_temps.py -c /home/pi/iot_certs/permanent_cert/perm_config.ini
You should see output similar to the following:

Congratulations, you have just successfully onboarded a small fleet of IoT devices following the AWS methodology designed to perform this registration process securely and at-scale!
To test your connections with real data, run the following script. It is similar to the script above except that (1) it does not subscribe to the topic it publishes to, and (2) it sends real temperature values every five seconds:
./publish_temps.py -c /home/pi/iot_certs/permanent_cert/perm_config.ini
The output should look like the following:

If you run this script on reboot via a crontab job (preceded by a 30s sleep to allow for the onewire modules to load at boot), your IoT device will resume streaming in the event of an (un)expected reboot:
$ crontab -e
@reboot sleep 30 && /home/pi/publish_temps.py -c /home/pi/iot_certs/permanent_cert/perm_config.ini
Repeat the onboarding and streaming processes for all Raspberry Pi devices placed throughout your home. You are well on your way to working with IoT data at-scale!
Next up: Storage and Visualization
Stay tuned for part 2 where I will be discussing the proper storage and visualization of large-scale streaming IoT data.
Caveat
The pub/sub style message publishing approach taken above works best for the device telemetry use case where data being streamed will be used not only by a backend analytics app but directly by end-users as well, for example via an app that lets users view the temperature values for their home. If the streaming data will only be used by a backend app, it is more cost-effective to publish messages via the “IoT Basic Ingest” approach as defined in AWS IoT Core Best Practices for Designing MQTT Topics document. By publishing messages to a topic associated with an IoT Rule rather than a generic IoT Core topic, you lose the ability to subscribe to the topic in exchange for not having to pay for the messaging component of IoT pricing.