
Running workloads on EKS using spot instances with on-demand instances fallback.
Here at DoiT International, we strive for cost efficiency and operational excellence. That’s why we were thrilled with the “Priority” expander addition to the K8s-Cluster Autoscaler. This allows for setting priority rules for node pool autoscaling decisions and thus supports creating a fallback mechanism from spot instances node groups to on-demand node groups for stateless workloads. We wanted to present a quick guide on how to use this feature with K8s clusters running on AWS EKS.
Feel free to skip to the actual demo if you’re already familiar with the Autoscaler and the different expander types
Cluster Autoscaler
What is Cluster Autoscaler?
This standalone program runs along with your workloads in the K8s cluster, communicates with the metrics-server (a cluster-wide aggregator of resource usage data), calculates the needed capacity, and calls the cloud provider API to provision (or remove) capacity to (or from) the K8s cluster. The cluster-autoscaler has different logics it can use to select which kind of capacity should be added to the cluster which are called Expanders.
What are Expanders?
There are currently five different Expanders implemented for Cluster Autoscaler:
random- this is the default Expander and should be used when you don't have a particular need for the node groups to scale differently.most-pods- selects the node group that would be able to schedule the most pods when scaling up. This is useful when you are using nodeSelector to make sure certain pods land on certain nodes. Note that this won't cause the Autoscaler to select bigger nodes vs. smaller, as it can add multiple smaller nodes at once.least-waste- selects the node group that will have the least idle CPU (if tied, unused memory) after scale-up. This is useful when you have different classes of nodes, for example, high CPU or high memory nodes, and only want to expand those when there are pending pods that need a lot of those resources.price- select the node group that will cost the least and, at the same time, whose machines would match the cluster size. This expander is described in more detail here. Currently, it works only for GKE.priority- selects the node group that has the highest priority assigned by the user. Its configuration is described in more detail here.
In this demo, we will show you how to utilize the “Priority” expander to make sure the Autoscaler first tries to scale out a spot instance node group and then, if it cannot, falls back to scaling out an on-demand node group.
While this is the default behavior for GKE clusters, which are configured using the “price” expander, this isn’t the case for EKS clusters. Fortunately, with the release of Cluster Autoscaler version 1.14, the “Priority” expander was added, and we can make use of it to set the priority by which different node groups get enlarged.
Demo
For this demonstration, we will create an EKS cluster with the awesome eksctl tool. Please make sure to use eksctl version 0.16.0 and above since we’ll be using the capacity-optimized allocation strategy for our spot instances pools, which support for was introduced with eksctl version 0.16.0.
The cluster will be comprised of two node groups; the first one is the spot instances node-group with the desired capacity of one instance, minimum zero instances, and a maximum of 10 instances. The second is the fallback on-demand node group with the desired capacity of zero instances, minimum zero instances, and a maximum of 10 instances.
Instance Types Diversification & Capacity-Optimized Spot Allocation Strategy — Maximises the Availability
Our workload requires around 1.5 vCPUs and 7 GB RAM to operate smoothly (in theory), and so we chose to diversify the 2 node pools with different EC2 instance types that are providing us with 2 vCPUs and 8 GB RAM. It’s mandatory that all of the different instance types in one pool will be comprised with the same vCPU & RAM specifications for the cluster-autoscaler to function.
Diversifying the pool with different instance types maximizes the availability of nodes since lack of one instance type capacity can be mitigated with other instance type availability. It might come very helpful in cases where both spot instances and on-demand capacity of one type is lacking, other instance types (which differ in pricing) will be available.
Using the capacity-optimized allocation strategy for our spot fleet makes sure that the nodes get provisioned from the instance type family with the largest available capacity and thus has the lowest probability of interruption.
Clone the demo repository and change to the cloned repo directory:
git clone https://github.com/doitintl/eks-spot-to-ondemand-fallback.git && cd eks-spot-to-ondemand-fallback
Create the Cluster:
eksctl create cluster -f cluster/cluster.yaml
This will trigger three CloudFormation stacks creation that will eventually set up the cluster infrastructure (EKS control plane, two Autoscaling Groups, VPC, etc). Once done, eksctl will notify you that the cluster is ready.
[✔] EKS cluster “my-eks-cluster” in “us-east-1” region is ready
eksctl will automatically update your Kubeconfig file with the new cluster information, so now you’re ready to run kubectl commands against the cluster.
Deploy the Metrics-server:
kubectl apply -f metrics-server/
The Autoscaler Priority Expander Config Map
This is where we set the priorities for the Autoscaler to pick when choosing which node group to scale when there’s a need for additional capacity. The config map name must be cluster-autoscaler-priority-expander, and the config map must be created in the same namespace the Autoscaler resides in (in our case we chose kube-system as the namespace for cluster Autoscaler).
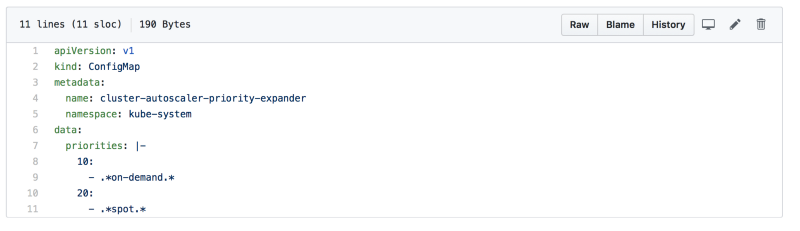
The priorities data is an array of keys (priority) and values (regexp to select the node group name). We created the node groups with the on-demand & spot strings embedded to their names so that the Cluster Autosclaer can prioritize accordingly.
Deploy the Autoscaler Priority Expander Config Map:
kubectl apply -f 0-autoscaler/
Deploy the Autoscaler:
First, you need to make sure the Autoscaler config file matches the ASG created by eksctl. To do so, please replace lines 157 and 158 on 1-autoscaler/cluster-autoscaler.yaml with the new ASG names created in your AWS account. You can grab them from the EC2 UI, or by using this AWS CLI command.
aws --region=us-east-1 autoscaling describe-auto-scaling-groups | jq '.AutoScalingGroups[]? | "\(.Tags[]|select((.Key=="alpha.eksctl.io/cluster-name") and (.Value=="my-eks-cluster"))|.ResourceId )"'
You should replace the SPOT string (line 157) with the spot instances ASG name, and the on-demand string (line 158) with the on-demand instances ASG.
Afterward, deploy the Autoscaler:
kubectl apply -f 1-autoscaler/
Deploy the app:
kubectl apply -f app/
Our current stack now consists of one spot instance node running one replica of our app.


Now if we scale our deployment from one replica to two replicas, the current node will not be able to get this new pod scheduled (we set the pod CPU request to 1200m CPU, while the node has 2 vCPU), and the Autoscaler will spin out another node, hopefully from the spot instances node group.
Scale up the app:
kubectl scale --replicas=2 deployment/php-apache
Indeed the new pod is in pending status since it cannot be scheduled to the available node.

After a few seconds, a new node is added.

Let's make sure it’s also from the spot instances node group.

Our pending pod is now scheduled for the new node.

Now let’s restrict the spot instances node group to a maximum size of two, and scale up our app, hoping a new on-demand instance will be added to handle the load.

Now let's scale our app to three replicas:
kubectl scale --replicas=3 deployment/php-apache
The Autoscaler would need another node for this new pod, and since the spot instances group is now at maximum capacity (remember we limited it to maximum two nodes), it should spin up a new node from the on-demand group.
A new pod is pending for a new node.

A new node gets added.

Let’s see what is the node group of this node.

The Trusty Fallback for your Nodes
We’ve seen how to create an EKS cluster with both spot instances node group and on-demand instances node group, and prioritize the spot instances node group expansion.
Clean up
eksctl delete cluster -f cluster/cluster.yaml
There are many aspects we chose to ignore for the simplicity of this example, such as spot instances interruption handling and HPA, but are nonetheless very important and should be considered when desgining you production environment.
Feel free to reach out on the comments if you have any questions!