
Cloud Intelligence™
送信Webトラフィックのセキュリティを強化:Google CloudのSecure Web Proxy
このページはEnglish、Deutsch、Español、Français、Italiano、Portuguêsでもご覧いただけます。


About Chimbu Chinnadurai
Senior Cloud Architect II
I've probably debugged a Kubernetes issue in more time zones than I care to count. Based in London, I help engineering teams across EMEA get their clusters to behave — and actually understand why they misbehaved in the first place.
I write, speak, and guest on podcasts about all things cloud-native. Away from the terminal: I enjoy cooking almost as much as simplifying overly complex systems.
My personal pageこれまでの記事では、Google Cloud Platform(GCP)で完全修飾ドメイン名(FQDN)によるエグレスフィルタリングを実装する手段として、ファイアウォールポリシールールとFQDNネットワークポリシーを紹介しました。これらを使えば、FQDNに基づいて送信トラフィックを制御するルールを手軽に作成できます。一方で、送信トラフィックそのものを検査・可視化する機能は備わっていません。
この弱点を補うのが Secure Web Proxy(SWP)です。Google Cloudリソースから出ていくすべてのWebトラフィック(HTTP/S)を検査し、ポリシーを適用します。SWPは検査と制御を一貫して行うことで、エグレストラフィックのセキュリティを大きく底上げします。
本記事では、Hub and Spoke型のネットワーク構成でSecure Web Proxyゲートウェイを構築する手順と、クライアント仮想マシン(VM)からの動作確認方法を紹介します。
**Secure Web Proxyとは?**
GCP Secure Web Proxyは、Virtual Private Cloud(VPC)ネットワークからインターネットやSaaSアプリケーションへ安全かつ確実にアクセスするためのフルマネージドサービスです。セキュリティポリシーの適用、Web経由の脅威からの防御、Webトラフィックの可視化を実現します。
他のプロキシサービスと比較したGCP Secure Web Proxyの主なメリットと特長は以下のとおりです。
- セキュリティ:URLフィルタリングにより、URLカテゴリ単位でアクセス制御ポリシーを適用できます。TLSトラフィックの検査にも対応し、マルウェア検知やコンテンツフィルタリングなどのセキュリティポリシーを徹底できます。さらにGoogle CloudのThreat Intelligenceと連携し、既知の悪意あるサイトやフィッシング攻撃から保護します。
- きめ細かなアクセス制御:Secure Web Proxy(SWP)ポリシーでは、Google Cloudリソースからインターネットへ向かう送信Webトラフィックの取り扱いをルールとして定義できます。送信元、宛先、トラフィック種別、またはこれらの組み合わせを条件にトラフィックを制限可能です。
- 可視性とモニタリング:Cloud LoggingおよびCloud Monitoringと統合されているため、エグレスWebトラフィックのログとメトリクスを手軽に収集・分析できます。
- スケーラビリティと信頼性:GCP Secure Web Proxyはフルマネージドサービスとして、トラフィック量に応じて自動でスケールし、高い可用性とパフォーマンスを維持します。
- 運用負荷の軽減: Secure Web Proxyにはセットアップ対象のVMがなく、セキュリティ維持のためのソフトウェア更新も不要で、伸縮自在にスケールします。最初にポリシーを設定すれば、リージョン単位のSecure Web Proxyインスタンスはすぐに利用を開始できます。
- コスト効率: 従量課金制を採用しており、利用したリソース分のみの支払いで、事前のコミットメントは不要です。
リファレンス構成
本構成では、Secure Web ProxyインスタンスをHUB VPCに配置し、workloadsはSpoke VPCにデプロイします。すべての送信リクエストはVPCピアリング経由でSecure Web Proxyへ転送されます。
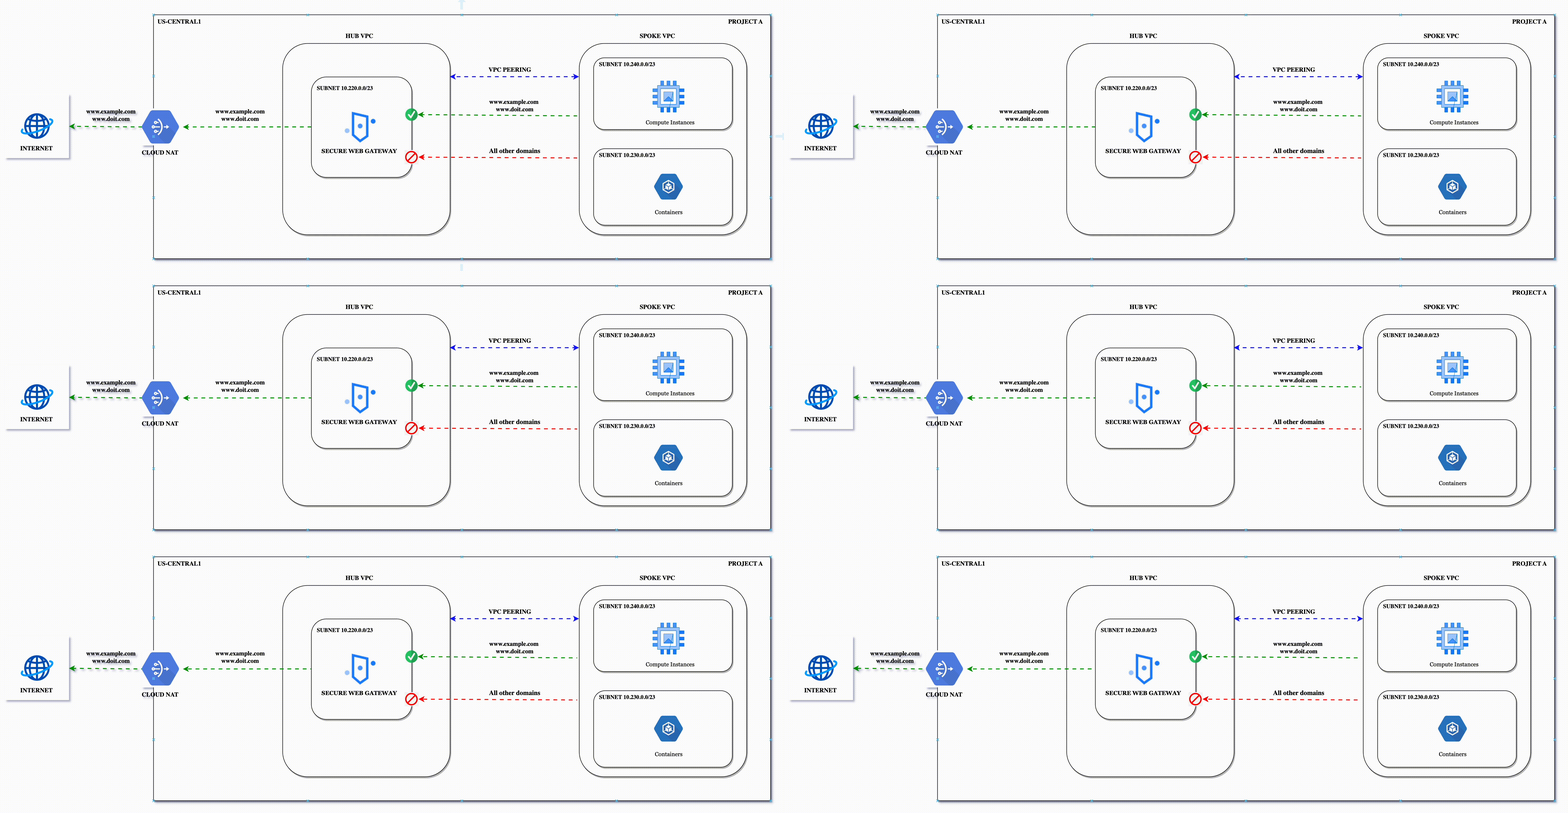
サンプルとなるHub and Spoke構成のアーキテクチャ概要
Cloud bill shouldn't be a mystery
One platform for AI and Cloud optimization.
Secure Web Proxyの構築と送信Webトラフィックの検証
ステップ1: 必要な環境変数を設定します。
export PROJECT_ID="your-project-id"
export REGION="your-region"
export HUB_VPC="hub"
export HUB_SUBNET="hub-subnet"
export HUB_SWP_SUBNET="swp-subnet" #proxy only subnet
export SPOKE_VPC="spoke"
export SPOKE_GCE_SUBNET="spoke-gce-subnet"
export SWP_CERT_NAME="swp-certificate"
export SWP_POLICY_NAME="swp-policy"
ステップ2: Hubネットワークとサブネットを作成します。
# Create a Hub custom Network
gcloud compute networks create $HUB_VPC \
   --project=$PROJECT_ID \
   --subnet-mode=custom

# Create the Hub nework subnet
gcloud compute networks subnets create $HUB_SUBNET \
   --project=$PROJECT_ID \
   --network=$HUB_VPC \
   --role="ACTIVE" \
   --purpose="PRIVATE" \
   --range=10.220.0.0/23 --region=$REGION
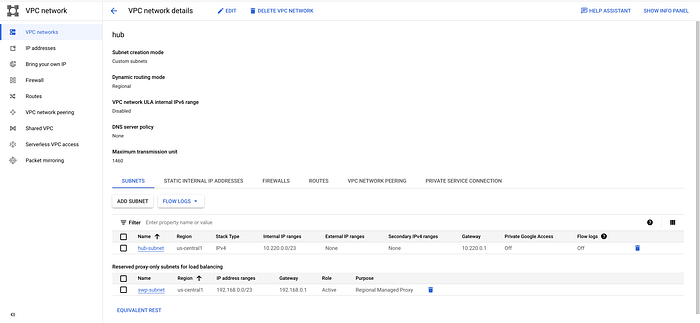
ステップ3: Secure Web Proxy用のプロキシサブネットを作成します。Secure Web Proxyの接続は専用に確保されたIPアドレスプールから提供されるため、推奨サブネットサイズは/23(プロキシ専用アドレス512個)です。
このプールは、Cloud NATやVPCネットワーク内の宛先と通信する際に、各プロキシのエグレス側に一意のIPアドレスを割り当てます。プロキシ用の範囲が他のネットワークと重ならないよう注意してください。
# Create proxy only subnet for SWP.
gcloud compute networks subnets create $HUB_SWP_SUBNET \
   --project=$PROJECT_ID \
   --network=$HUB_VPC \
   --role="ACTIVE" \
   --purpose="REGIONAL_MANAGED_PROXY" \
   --range=192.168.0.0/23 --region=$REGION
ステップ4: Spokeネットワークとサブネットを作成します。
# Create a Spoke custom Network and its subnet
gcloud compute networks create $SPOKE_VPC \
   --project=$PROJECT_ID \
   --subnet-mode=custom

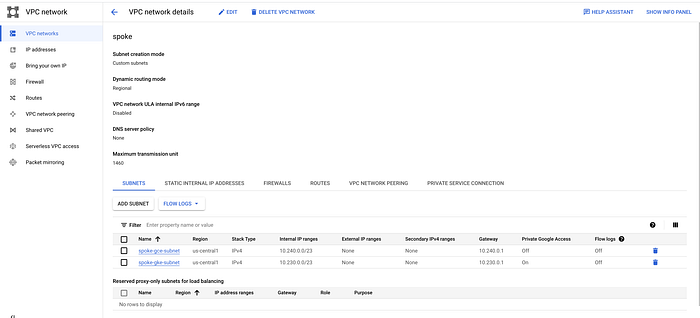
gcloud compute networks subnets create $SPOKE_GCE_SUBNET \
   --project=$PROJECT_ID \
     --network=$SPOKE_VPC \
   --range=10.240.0.0/23 --region=$REGION
ステップ5: Spoke VPCのデフォルトインターネットルートを削除し、すべての送信トラフィックがHub VPC経由で流れるようにします。
# Get the Default Route internet and the delete the rule
ROUTE_NAME=$(gcloud compute routes list --filter="network: $SPOKE_VPC AND nextHopGateway:default-internet-gateway" --format="value(name)")

gcloud compute routes delete $ROUTE_NAME --quiet
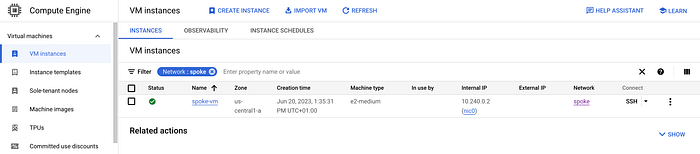
ステップ6: Spokeネットワーク内に検証用のCompute Engineインスタンスを作成します。
# Create VM
gcloud compute instances create spoke-vm \
  --zone=${REGION}-a \
  --machine-type=e2-medium \
  --network-interface=stack-type=IPV4_ONLY,subnet=${SPOKE_GCE_SUBNET},no-address \
  --project=$PROJECT_ID

# Allow ssh via IAP
gcloud compute firewall-rules create allow-ssh-ingress \
  --project=$PROJECT_ID \
  --direction=INGRESS \
  --priority=1000 \
  --network=$SPOKE_VPC \
  --action=ALLOW \
  --rules=tcp:22 \
  --source-ranges="35.235.240.0/20"
ステップ7: HubとSpokeのVPCネットワーク間でVPCピアリングを構成します。
# Hub to spoke
gcloud compute networks peerings create hub-to-spoke \
   --project=$PROJECT_ID \
   --network=$HUB_VPC --peer-network=$SPOKE_VPC \
   --auto-create-routes

# Spoke to Hub
gcloud compute networks peerings create spoke-to-hub \
   --project=$PROJECT_ID \
   --network=$SPOKE_VPC --peer-network=$HUB_VPC \
   --auto-create-routes
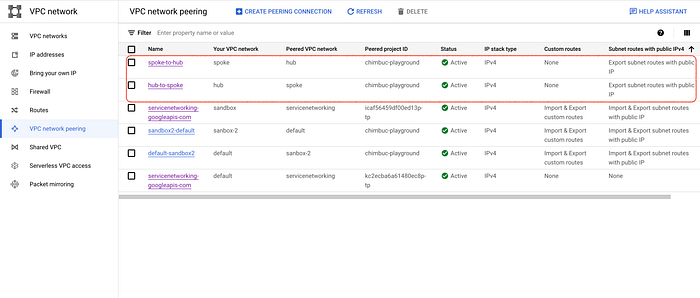
ステップ8: Secure Web ProxyゲートウェイはTLSトラフィックを処理するため、証明書が必要です。これはクライアントがプロキシに対して認証する際に使う証明書です。SSL証明書を作成し、Certificate Managerにアップロードします。
#create the certificate
openssl req -x509 -newkey rsa:2048 \
  -keyout key.pem \
  -out cert.pem -days 365 \
  -subj '/CN=demo.swp.local' -nodes -addext \
  "subjectAltName=DNS:demo.swp.local"

#upload the certificate
gcloud certificate-manager certificates create $SWP_CERT_NAME \
   --certificate-file=cert.pem \
   --private-key-file=key.pem \
   --location=$REGION
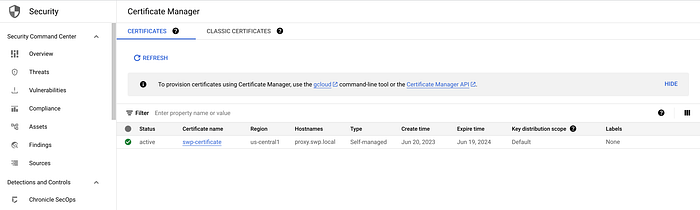
ステップ9: Secure Web Proxyポリシーを作成します。
Secure Web ProxyにはTLS検査サービスもあり、TLSトラフィックを傍受して暗号化されたリクエストを検査し、セキュリティポリシーを適用できます。設定例はTLS検査の概要を参照してください。
#Sample policy without enable TLS inspection.
cat << EOF > swp-policy.yaml
description: Secure Web Proxy policy
name: projects/$PROJECT_ID/locations/$REGION/gatewaySecurityPolicies/$SWP_POLICY_NAME
EOF

gcloud network-security gateway-security-policies import $SWP_POLICY_NAME \
  --source=swp-policy.yaml \
  --location=$REGION
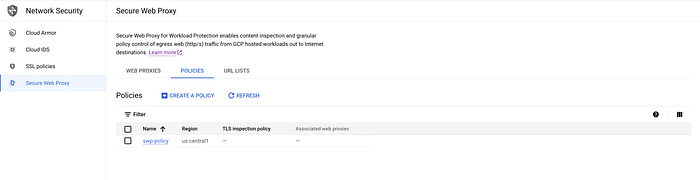
ステップ10: 前のステップで作成したポリシーを使い、Secure Web Proxyゲートウェイインスタンスを作成します。
# Create config file
cat << EOF > swp-gateway.yaml
name: projects/$PROJECT_ID/locations/REGION/gateways/swp-gateway
type: SECURE_WEB_GATEWAY
ports: [443]
certificateUrls: ["projects/$PROJECT_ID/locations/$REGION/certificates/$SWP_CERT_NAME"]
gatewaySecurityPolicy: projects/$PROJECT_ID/locations/$REGION/gatewaySecurityPolicies/$SWP_POLICY_NAME
network: projects/$PROJECT_ID/global/networks/$HUB_VPC
subnetwork: projects/$PROJECT_ID/regions/$REGION/subnetworks/$HUB_SUBNET
scope: basic-scope
EOF

gcloud network-services gateways import swp-gateway-instance \
    --source=swp-gateway.yaml \
    --location=$REGION
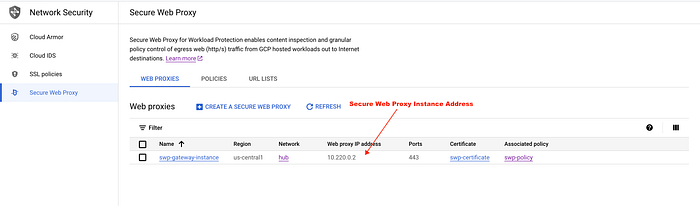
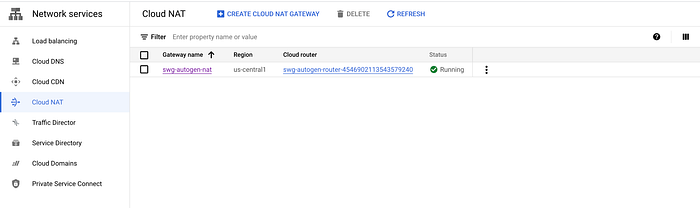
Secure Web Proxyインスタンスをプロビジョニングすると、インターネット接続用のCloud NATゲートウェイが自動的に作成されます。このCloud NATゲートウェイにアクセスできるのは、同一リージョン・同一ネットワーク内のSecure Web Proxyエンドポイントに限られます。仮想マシン(VM)インスタンスやGoogle Kubernetes Engine(GKE)ノードなど、それ以外のエンドポイントから当該ゲートウェイ経由でトラフィックを流すことはできません。
ステップ11: Spokeネットワーク内のテスト用インスタンスにSSH接続し、エグレスリクエストを検証します。Secure Web Proxyポリシーにはルールが設定されていないため、デフォルトではすべての送信トラフィックが拒否されます。
#sample commands
#replace $SWP_HOST_IP with the IP address of the SWP Gateway IP
$export https_proxy=https://$SWP_HOST_IP
$curl -s -I --proxy-insecure https://www.example.com
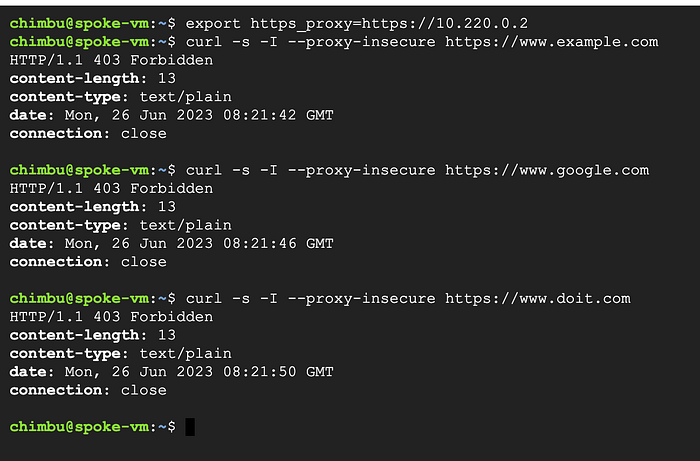
テスト用インスタンスでの実行結果
ステップ12: リファレンス構成に沿って、送信トラフィックを許可・拒否するSecure Web Proxyルールを作成します。
Secure Web Proxy(SWP)ルールは、プロキシが送信Webトラフィックをどのように処理するかを定義する記述です。
このサンプルポリシーは、ホスト名に基づいて送信接続を許可します。属性と演算子の一覧についてはCELマッチャー言語を参照してください。
#allow www.example.com,The rule with the lowest numeric value assigned has the highest logical priority and is evaluated prior to rules with lower logical priorities.
cat << EOF > allow-example-com.yaml
name: projects/$PROJECT_ID/locations/$REGION/gatewaySecurityPolicies/$SWP_POLICY_NAME/rules/allow-example-com
description: Allow example.com
enabled: true
priority: 1000
basicProfile: ALLOW
sessionMatcher: host() == 'www.example.com'
EOF

gcloud network-security gateway-security-policies rules import allow-example-com \
    --source=allow-example-com.yaml \
    --location=$REGION \
    --gateway-security-policy=$SWP_POLICY_NAME

#allow www.doit.com
cat << EOF > allow-doit-com.yaml
name: projects/$PROJECT_ID/locations/$REGION/gatewaySecurityPolicies/$SWP_POLICY_NAME/rules/allow-example-com
description: Allow example.com
enabled: true
priority: 999
basicProfile: ALLOW
sessionMatcher: host() == 'www.doit.com'
EOF

gcloud network-security gateway-security-policies rules import allow-doit-com \
    --source=allow-doit-com.yaml \
    --location=$REGION \
    --gateway-security-policy=$SWP_POLICY_NAME
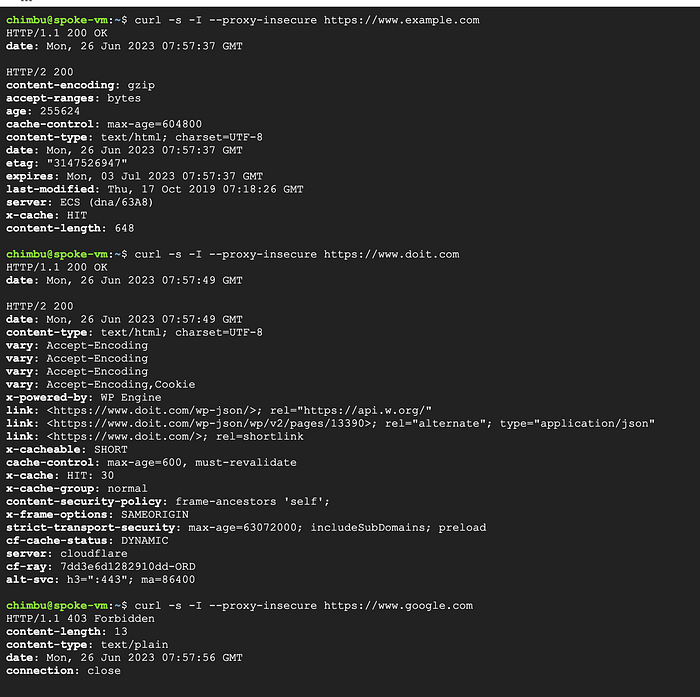
テスト用インスタンスでの実行結果
上記の結果から、Secure Web Proxyゲートウェイがルールで許可されたホスト名への送信接続のみを通し、それ以外のドメインへの接続は遮断していることが確認できます。
本記事がお役に立てば幸いです。さらに詳しく知りたい方は、以下のリソースをご覧ください。


