


Are you interested in learning how to build out an IoT operation in the cloud that is fully-managed, auto-scaling, and serverless?
Covered in this three-part IoT on GCP series of posts will be an entire IoT workflow: From device registration to the streaming and long-term storage of data, to the analysis and visualization of that data.
After reading Part One, you’ll know how to securely register millions of IoT devices streaming telemetry data to your Google Cloud environment.
This is the first of a three-part series, with:
- Proper storage and visualization of such high-throughput data streams covered in Part Two, and
- The construction of a functional machine learning model on IoT data covered in Part Three.
Throughout the series, we will use GCP as our cloud provider and Raspberry Pi devices with temperature sensors attached as our example IoT devices.
Overview
This discussion is broken up into the following sections:
- Raspberry Pi software and hardware setup
- Hands-on device registration and credentials provisioning
- Device connectivity testing and streaming of temperature data
- Google Cloud IoT functionality caveats
- Storage of streaming data (covered in Part Two)
- Visualization of streaming data (covered in Part Two)
- Building an effective machine learning model with IoT data (covered in Part 3)
To get through this article, you only need experience with Bash and Python and a basic understanding of how to navigate the Google Cloud Console.
Setting up Raspberry Pi software and hardware
First, get several Raspberry Pi devices up-and-running — I will be using Pi 3 devices. I recommend using the Raspbian OS Imager to automate the OS install on microSD cards.
Install the Python packages
Once you have reached the desktop and updated your device, run the following command to install the Google Cloud IoT-specific SDK:
pip3 install -U pyjwt paho-mqtt
Before we move on, it is important to understand why we are installing paho-mqtt rather than the general-use google-api-python-client Python SDK for Google Cloud. The more commonly used Python SDK, as well as the gcloud GCP CLI, are HTTP-based. This protocol is useful for quickly executing most actions. However, HTTP is not a suitable protocol for sending messages over long-lived connections with a high likelihood of intermittent connectivity, wherein data primarily flows away from the connecting device.
MQTT is a protocol used in IoT, via packages such as paho-mqtt, because it is designed to simplify enabling a device to frequently publish messages and infrequently receive messages despite connectivity challenges.
Connect a digital temperature sensor
Now that your Raspberry Pi has the required Python packages installed, you will need to connect a digital temperature sensor to it. I recommend using this DS18B20 sensor if you want to follow along with the article.
You also need the following to connect the sensor to your Raspberry Pi:
- Mini breadboards
- Breadboard jumper wires
- Assorted resistor kit (we need a 4.7K Ohm resistor)
If you have to wait for these items to arrive, feel free to move along in the article, as a script for streaming simulated temperatures will be provided.
If you have these items, the first five minutes of this tutorial walks you through how to connect the sensor to your Raspberry Pi and validate it is receiving temperature values.
In addition to the process detailed in the above tutorial, I recommend adding the following to /etc/modules to ensure the onewire modules are loaded on boot instead of running modprobe after every reboot:
w1-gpio
w1-therm
Registering your IoT devices
Shown below is a complete working example of how to set up your IoT Registry with securely registered devices, from which we will stream temperature data to the Google Cloud IoT platform.
Create a registry for your devices
In the Google Cloud Console:
- Create a new project (e.g. ‘IoTTempStreaming’)
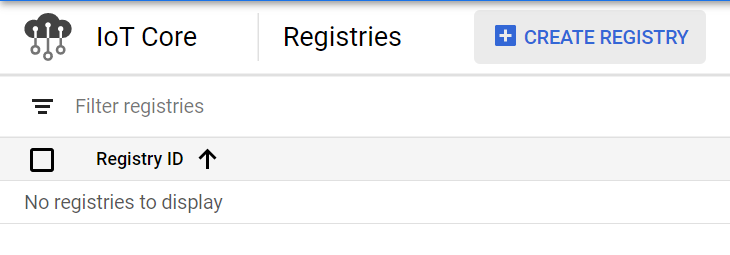
- Go to the IoT Core service to enable the IoT API
- Click “Create registry” to create a registry for adding your IoT devices.
IoT devices streaming to GCP can send their messages to the IoT Core if they are validated as a credentialed device stored in the IoT Registry, making the creation of the registry an essential first step.
Create a Pub/Sub topic
Messages sent to the IoT Core — along with critical message metadata such as a device’s unique deviceId— will be forwarded behind-the-scenes to a ‘topic’ in Pub/Sub, Google Cloud fully-managed, auto-scaling, and serverless message queue system.
Thus, we will also be creating Pub/Sub topics within the IoT Registry prompt so that our telemetry data will ultimately arrive into Pub/Sub for downstream processing.
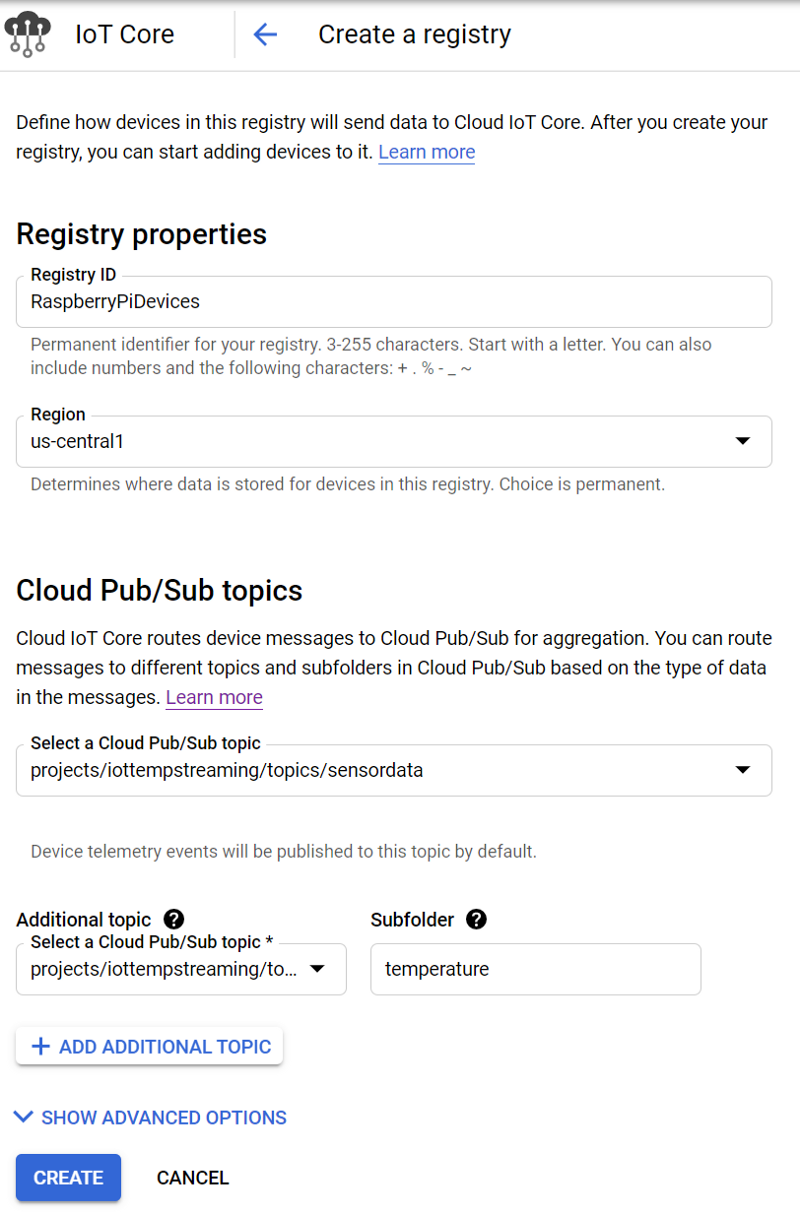
Follow these steps to create a Pub/Sub topic from the IoT registry prompt:
- Name your Registry ID “RaspberryPiDevices” in the us-central1 region
- Create a Pub/Sub topic named “sensordata” where IoT telemetry messages will arrive by default.
- Under “Additional topics” create a new Pub/Sub topic named “temperature” where messages published to an IoT topic subfolder — also named “temperature” — will arrive.
This setup guarantees that only your temperature messages published to a specific IoT subfolder will arrive in the temperature Pub/Sub topic, and all other (unexpected) telemetry events will hit a default ‘sensordata’ topic.
I would also recommend expanding the advanced options and only permitting the MQTT protocol by unchecking HTTP:
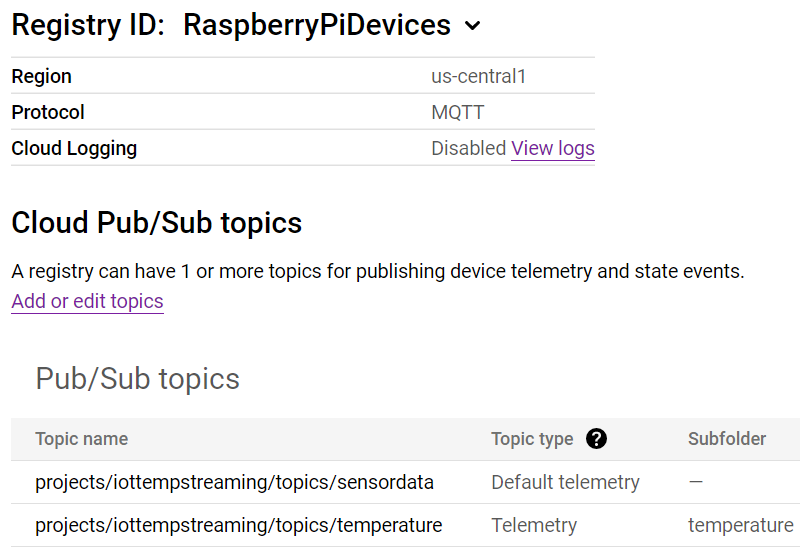
After creation, your registry should look like this:
Create a registered device
Now that we have a device registry, let’s create a registered device.
To start off, we will need (1) a public-private key pair to be associated with the device, and (2) the Google root certificate.
Detailed below are the commands to run on a Raspberry Pi which generate Elliptic Curve keys and grab the Google root cert (commands are based on the relevant Google Cloud documentation). EC keys possess a smaller data footprint than traditional RSA keys and will help IoT devices maintain optimal throughput in connectivity-challenged areas:
$ mkdir -p /home/pi/GCP/iot_keys/
$ cd /home/pi/GCP/iot_keys/
$ wget
$ openssl ecparam -genkey -name prime256v1 -noout -out ec_private.pem
$ openssl ec -in ec_private.pem -pubout -out ec_public.pem
$ cat ec_public.pem
$ cd ../
Once you run the above commands:
- Copy the public key displayed in the terminal
- Head over to the IoT Registry and navigate to Devices
- Click Add Device
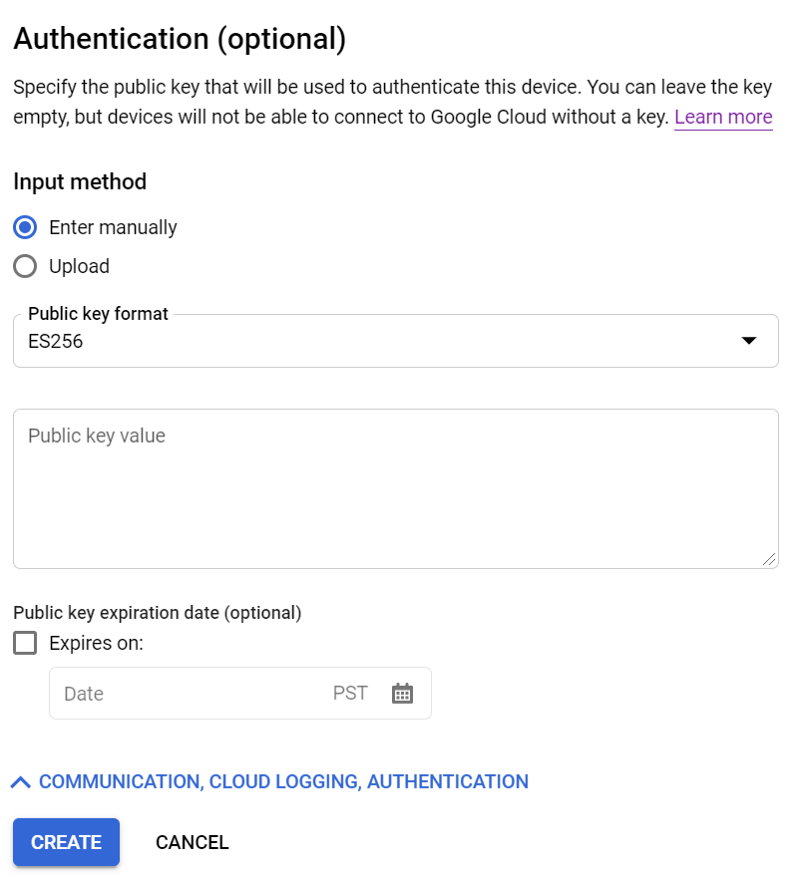
- Name your device (e.g. “device1”), and paste your public ES256 key under Authentication as shown below.
- Click Create
Once created, credentials associated with an IoT core-registered device are ready for use on a Raspberry Pi!
Make note of the Numeric ID assigned to the device, the Project ID, and the Registry ID.
With these values, as well as the keys and Google root cert on the device, we need to create a config file named gcp_iot_config.txt. This file will define authentication and IoT endpoint details for a specific device to use. Described just a bit further down in the article is a Python script which streams temperature values by making use of this config file:
$ pwd
/home/pi/GCP/
$ cat gcp_iot_config.txt
[SETTINGS]
# Set the path to the location containing your keys
KEY_PATH = /home/pi/GCP/iot_keys/
# Specify the private key and Google root cert names
PRIVATE_KEY      = ec_private.pem
GOOGLE_ROOT_CERT = roots.pem
# Set the details required for using your IoT endpoint
REGISTRY_ID = <REGISTRY_ID>
DEVICE_ID   = <DEVICE_NUMERIC_ID>
REGION      = us-central1
PROJECT_ID  = <PROJECT_ID>
And voila! Your device is now ready for securely streaming telemetry data to a Pub/Sub topic via GCP’s IoT Core authentication platform. Repeat the process above to generate unique credentials and register each new device.
Test device connectivity
Let’s test device connectivity by running the following script, titled ‘publish_temps.py’, which streams device-derived or simulated temperature values, depending on whether you have line 107 or 108 commented out.
(The script is an adaptation of two example Google Cloud scripts: #1 and #2)
$ pwd
/home/pi/GCP/
$ ./publish_temps.py
There is quite a bit going on here — I highly recommend reviewing the code to gain a better understanding of how it securely connects and streams data.
Upon running this script, you should see output similar to the following:

If you run this script on reboot via a crontab job (preceded by a 30s sleep to allow for the onewire modules to load at boot), your IoT device will resume streaming in the event of a (un)expected reboot:
$ crontab -e
@reboot sleep 30 && /home/pi/GCP/publish_temps.py -c /home/pi/GCP/gcp_iot_config.txt >> /home/pi/GCP/publish_temps.log 2>&1
Repeat the onboarding and streaming processes for all Raspberry Pi devices placed throughout your home. You are well on your way to working with IoT data at-scale!
Verify that data is streaming
Let’s quickly verify the messages are arriving in Google Cloud by viewing the telemetry data hitting Pub/Sub.
- Create a Pub/Sub subscription to the ‘temperature’ topic
- Navigate to the subscription
- Click View Messages, and then select the Pull radio button
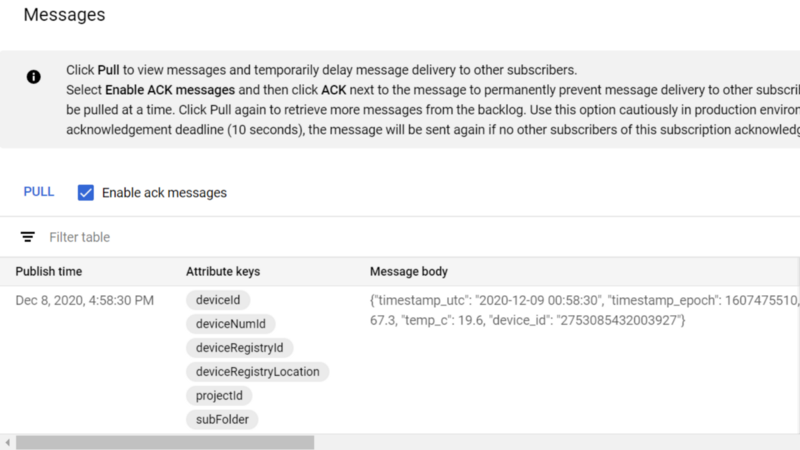
You should see these messages as they arrive, complete with the temperature and timestamp information sent by the body of the message, as well as the attribute metadata uniquely identifying which device is sending those values. The attribute metadata is useful not only for analytics and end-user dashboards but for identifying and banning abusive/hacked devices as well.
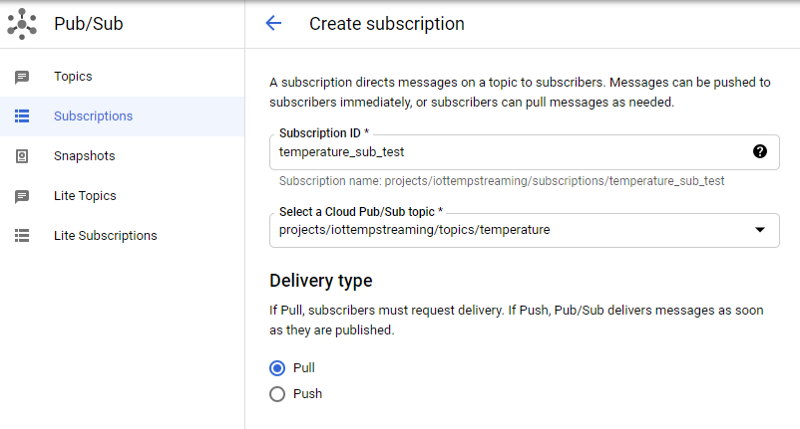
The following shows what a subscription to the temperature topic looks like:
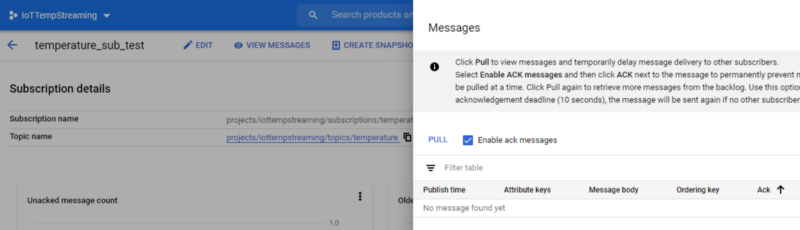
Once you click “PULL”, you should begin seeing messages and their attributes:

If you have made it this far, congratulations (seriously)! While it is exciting to see real data from IoT devices hitting Pub/Sub, we have but scratched the surface.
To truly make use of this data, we need to optionally transform the data, move/batch-load it into a data warehouse, and analyze the data. This needs to occur with an ecosystem of GCP services that enable this flow of data to function reliably, at-scale, and cost-effectively, during all stages of development from initial testing to petabyte-scale production usage and beyond, all with little to no infrastructure maintenance. If you want to see how this is done, stay tuned for parts two and three!
Next up: Storage and Visualization
Stay tuned for part two where I will be discussing the proper ETL, storage, and visualization services that can relatively easily enable actionable use of large-scale streaming IoT data.
Google Cloud IoT Functionality Caveats
Better fully-managed GCP service handling of deviceId
You may have noticed that the Python script streams a device_id key:value pair in the message body, which actually duplicates the deviceId attribute present in the Pub/Sub message as assigned by IoT Core via the message’s association with the unique key-value pair for the streaming device.
Why would I have the script send a device_id that could easily be spoofed on a hacked device, ultimately resulting in a data warehouse with poisoned data when these messages are moved into long-term storage?
Well, I’m getting a bit ahead of myself here, but as we will see in Part Two there is a convenient fully-managed, auto-scaling, and mostly serverless workflow that can transform and move Pub/Sub messages into BigQuery using Dataflow, Google Cloud fully-managed version of the Apache Beam.
Unfortunately, the default GCP-written ‘Pub/Sub-to-BigQuery’ template available in Dataflow provides no means for moving message attributes into BigQuery; only the contents of a message body can be moved. I confirmed with various GCP engineers that a custom Dataflow Javascript UDF cannot be written for their default templates to add message attributes into Dataflow sinks such as BigQuery. Alternatively, writing Java Dataflow jobs — whether from scratch or as a modification of existing GCP-written templates — is a time-intensive undertaking that requires ongoing template maintenance and updates, a task which I imagine most GCP customers will not want to pursue.
Thus, by default, there are no simple and secure means for associating an IoT message hitting Pub/Sub and being shuttled to destination data sinks with that message’s deviceId.
I have raised this oversight with GCP, and since raising this concern they have initiated a public feature request to make sure the default templates have support for passing on these valuable — and absolutely required — values to support the IoT use case. I will update the article accordingly as soon as this FR has been fulfilled, but until then, for demo purposes, it is much easier to test out the usage of device_id by sending it through the message body than it is to rewrite a Dataflow template that ought to be present by default.
How would I ideally provision device-unique credentials?
The process for registering a single IoT device is typically explained as:
- Create a public-private key pair associated in GCP with IoT permissions
- Provision and place these files on the device in the factory
- Have the factory register those credentials in the IoT Registry
- Enable the key pair to make IoT API calls that stream data to the cloud.
Such a setup by itself is not ideal, however, as real-world IoT use cases involve millions of devices streaming to a cloud environment. Each device in such a fleet must be given a unique set of credentials so that if a device or its Google Cloud credentials become compromised and used for illegitimate purposes, that credential set can be disabled without impacting other devices in the fleet.
GCP has this functionality and, as seen in the script above, it also supports only permitting a device to publish to a topic unique to the device. However, given the credential provisioning methodologies available, coordinating key creation, deployment, and registration for millions of devices is a challenge.
How can the process of creating device-specific credentials be done as simply as possible? Can it be done without creating millions of certificates in advance and coordinating their unique placement on devices during manufacturing? Do you want to rely on a manufacturer to reliably place these files without duplication?
Alternatively, can device registration and credentialing be done without requiring the manufacturer to issue API calls to your IoT Registry to create a new credentials on-demand when a device rolls down the production line to be bootstrapped with software and credentials? What happens to the device production line if the connection to your API Gateway powering IoT registration goes down?
I would prefer to avoid these methods because they are more complex, error-prone, and place an unnecessary burden on the manufacturer.
A secure and sensibly scalable device registration system I would like to see GCP support would follow these guidelines:
- A single IoT certificate is created that will be placed on all IoT devices. This certificate, dubbed a ‘bootstrap’ certificate, would be associated with a permissions policy that only allows a device to issue a request to (a) create and retrieve device-specific credentials if the request is granted, and (b) add itself to the IoT Registry of devices.
- The GCP IoT Core platform, upon receiving and granting the credentials creation request, will create a new key-pair. The associated IoT permissions — as Google Cloud does now — should only allow a device to publish messages to a device-unique topic.
- Permitting the creation of device-unique credentials should be gated by the validation step. This would be a Cloud Function you write that requires unique identifiers to be provided in the request so that they can be checked against a whitelist (e.g. a list of serial numbers manufactured or MAC addresses used) and/or a blacklist (e.g. a list of serial numbers associated with compromised, abusive, or already-registered devices).
- If the device-unique certificate request is approved by the validation step, the device is entered into the IoT Registry and the new credential files are delivered to the device for use in data streaming.
With this workflow, an IoT device manufacturer would simply have to provide each device with the bootstrap certificate. The device-unique key-pair that allows for data streaming could be created and obtained immediately within the manufacturing plant if desired, or it could be created later when it is in the hands of the end-user.
Regardless of when the credentials are obtained, the manufacturer would simply bootstrap software onto the device you provide which runs the bootstrap certificate-based, device-unique key-pair creation process when:
- The device boots up
- An Internet connection is available, and
- A device-unique key-pair is found to be missing
Unfortunately, such functionality is missing (for now). But outside of mass device registration, Google Cloud IoT offering —when paired with downstream fully-managed message processing services (covered in Part Two) — altogether makes for a strong, secure, and easily scalable cloud-backed solution in the IoT realm.